
Stage Traxx MIDI Syntax — A Quick Reference
Stage Traxx 4 lets you embed MIDI commands directly inside your song lyrics. When playback reaches one of these tags, the corresponding MIDI message is sent out — to the Acoustic Play Editor, to your TC Helicon Play Acoustic/Electric, or to any other MIDI-aware app. This post is a cheat sheet for the syntax, plus a copy-paste example you can drop straight into a Stage Traxx song.
The official documentation is at stagetraxx.com/docs/v4/midi — Sending MIDI commands. The notes below are a practical summary aimed at editor users.
The two shapes you'll use
Every MIDI command in Stage Traxx lives inside square brackets and starts with the word midi. There are two variants:
- Immediate — fires the moment the song is loaded. No timestamp.
[midi: PC0@1] - Timed — fires at a specific offset into the song. The timestamp goes right after
midi.
[midi@00:05.00: CC34.127@1]
So the general shape is:
[midi: <event>]              ← fires immediately on song load
[midi@<mm:ss.ms>: <event>]    ← fires at the given time offset
Rule of thumb: every MIDI tag must either be at the very top of the lyrics (no timestamp = immediate) or carry a timestamp like @00:05.00. Without one of those, Stage Traxx won't fire it.
Event types
Two event types cover almost every use case for the editor:
Program Change — PC<n>@<channel>
Tells the editor (or any synth) to switch to a specific preset / patch / program.
PC0@1— Program Change 0 on MIDI channel 1PC1@1— Program Change 1 on channel 1PC127@10— Program Change 127 on channel 10
PC has no value byte — just the program number and the channel.
Control Change — CC<num>.<value>@<channel>
Sends a controller value. You need both the CC number (0–127) and the value (0–127), and then the channel.
CC34.127@1— CC 35 with value 127 on channel 1 (typically "on")CC34.0@1— CC 35 with value 0 on channel 1 (typically "off")CC7.64@1— CC 7 (volume) with value 64
In the editor, CC numbers are how you turn effect blocks and FX presets on and off. For example:
- Map CC34 → HIT (Live tab → device panel → Edit → HIT). Then
[midi@…: CC34.127@1]turns HIT on, and[midi@…: CC34.0@1]turns it off — same CC, value alone decides. (CC34 is what the bundled Sample Config uses; avoid CC28, the device emits that itself and a HIT mapping on CC28 will feedback-loop.) - Map CC21 → "Full FX" FX preset (this is what the bundled Sample Config already does).
[midi@…: CC21.127@1]activates the preset (writes its saved settings to the device);[midi@…: CC21.0@1]deactivates it (reverts to the state from just before the activation).
The same CC + value-0/127 convention works for both HIT and FX preset mappings. Value 127 = on / activate, value 0 = off / revert.
Don't type these by hand — use MIDI Learn
You almost never need to write a tag manually. Stage Traxx's MIDI Learn function inserts the correct tag for you, including the channel:
- Position the cursor in the lyrics where you want the trigger to fire.
- Tap MIDI Learn in Stage Traxx.
- Switch to the editor and click the right Send button:
- Setlist row — click Send on the song's row in the setlist. Sends that song's PC (e.g.
PC0). - HIT (device panel → Edit → HIT) — Send On emits
CCN.127, Send Off emitsCCN.0. - FX preset (device panel → Edit → FX preset card) — same idea: Send On emits
CCN.127, Send Off emitsCCN.0.
- Setlist row — click Send on the song's row in the setlist. Sends that song's PC (e.g.
- Stage Traxx receives the MIDI message and pastes the matching tag (
[midi: PC1@1],[midi: CC34.127@1],[midi: CC34.0@1], etc.) at the cursor — with the correct CC/PC number, value, and channel already filled in. - If you want the tag to fire later in the song instead of immediately, edit it to add a timestamp — change
[midi: …]to[midi@00:18.00: …].
That's the whole flow: cursor → Learn → click Send On / Send Off in the editor → Stop. The channel will match whatever MIDI port and channel the editor is using, so you don't have to remember or type @1 yourself.
How songs map to presets
Pick a unique PC number per song in your setlist:
- Song 1 —
[midi: PC0@1]→ HIGH&LOW CHORUS - Song 2 —
[midi: PC1@1]→ ROBOTIC - Song 3 —
[midi: PC2@1]→ SHORT ECHO - Song 4 —
[midi: PC3@1]→ DBL LOW CHORUS - Song 5 —
[midi: PC4@1]→ CLEAN
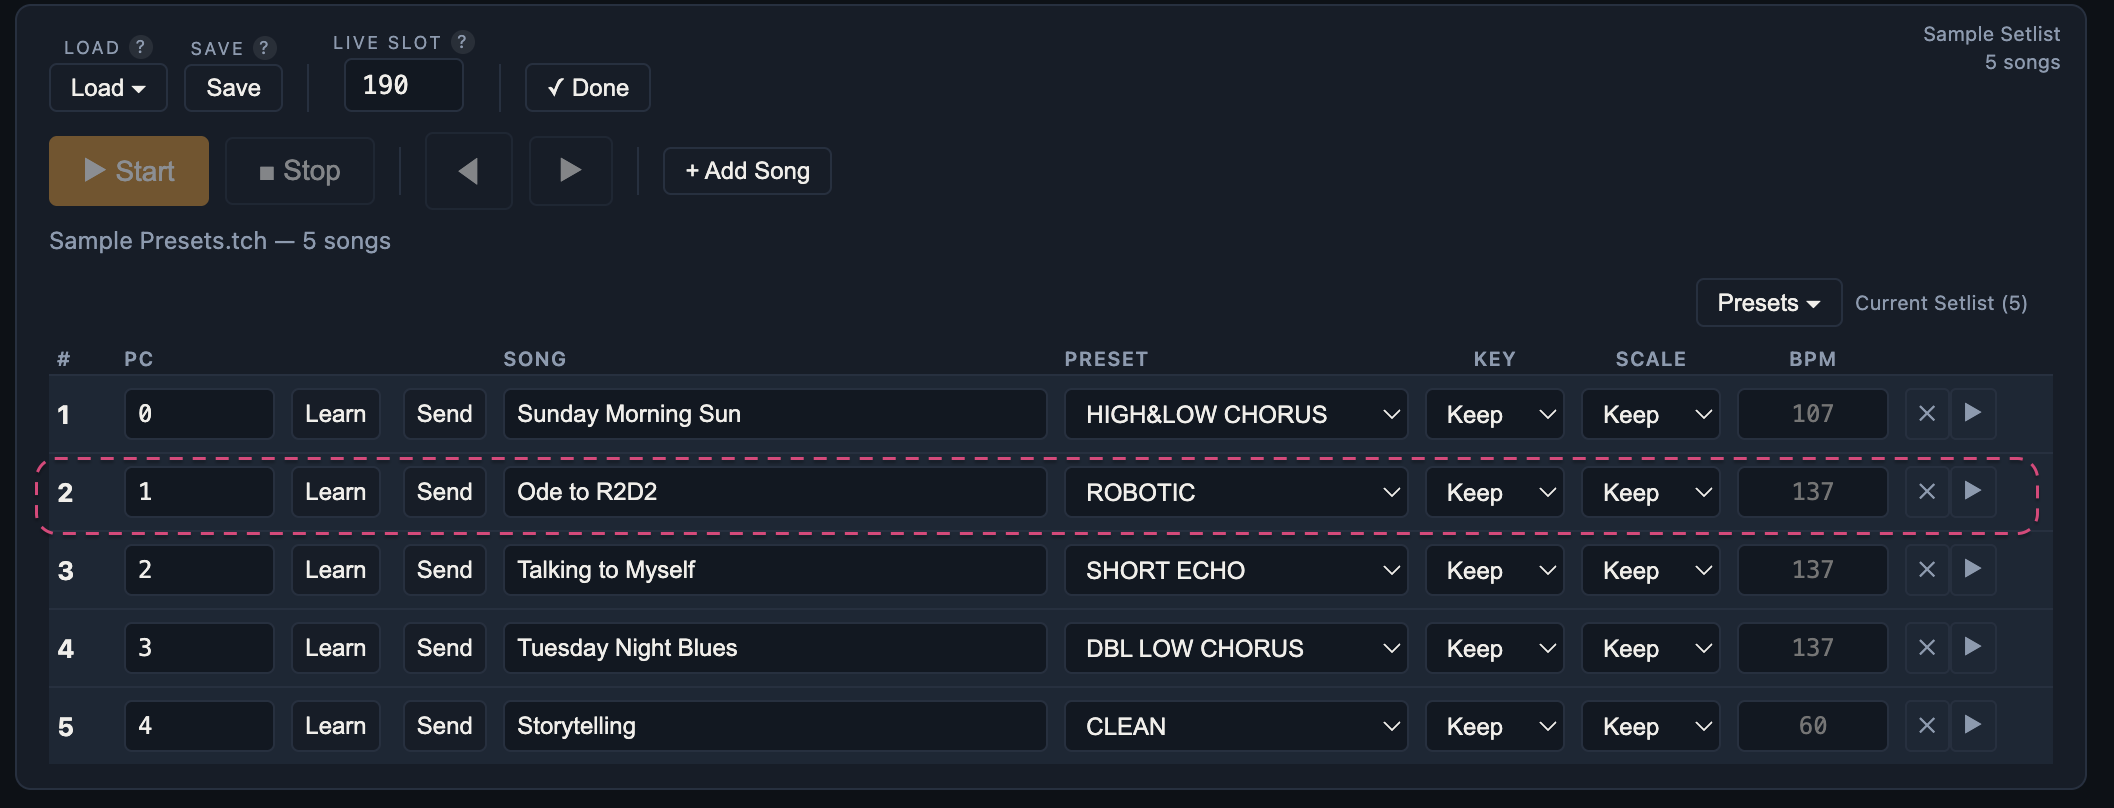
In the editor's Live tab, each row in the setlist already declares which PC triggers it. When Stage Traxx reaches a song and fires [midi: PC1@1], the editor sees PC 1, looks up the matching row, and sends the corresponding preset to your device. No further configuration needed.
Copy-paste example
Here's a full song body you can paste into Stage Traxx and adapt. It loads the ROBOTIC preset on song start (PC 1 from the bundled Sample Setlist), switches HIT on right before each chorus, and switches it off after.
What you need to set up in the editor first
For the tags in this example to do anything, the editor needs two mappings configured:
- Setlist song → PC 1. Open the editor's Live tab. In the Setlist card click Load → Sample Setlist — it ships with five rows mapped to PC 0..4 (HIGH&LOW CHORUS / ROBOTIC / SHORT ECHO / DBL LOW CHORUS / CLEAN). The example below uses PC 1 (ROBOTIC). You can verify by clicking Send on the ROBOTIC row — the device should jump to that preset.
- HIT → CC 34. Above the setlist, in the Live Controls card, click Load → Sample Config. That ships HIT pre-mapped to CC 34. Or in the device panel click Edit, open the HIT card, and set it to CC 34 by hand (or Learn from Stage Traxx). Either way, once mapped, Send On emits
CC34.127and Send Off emitsCC34.0.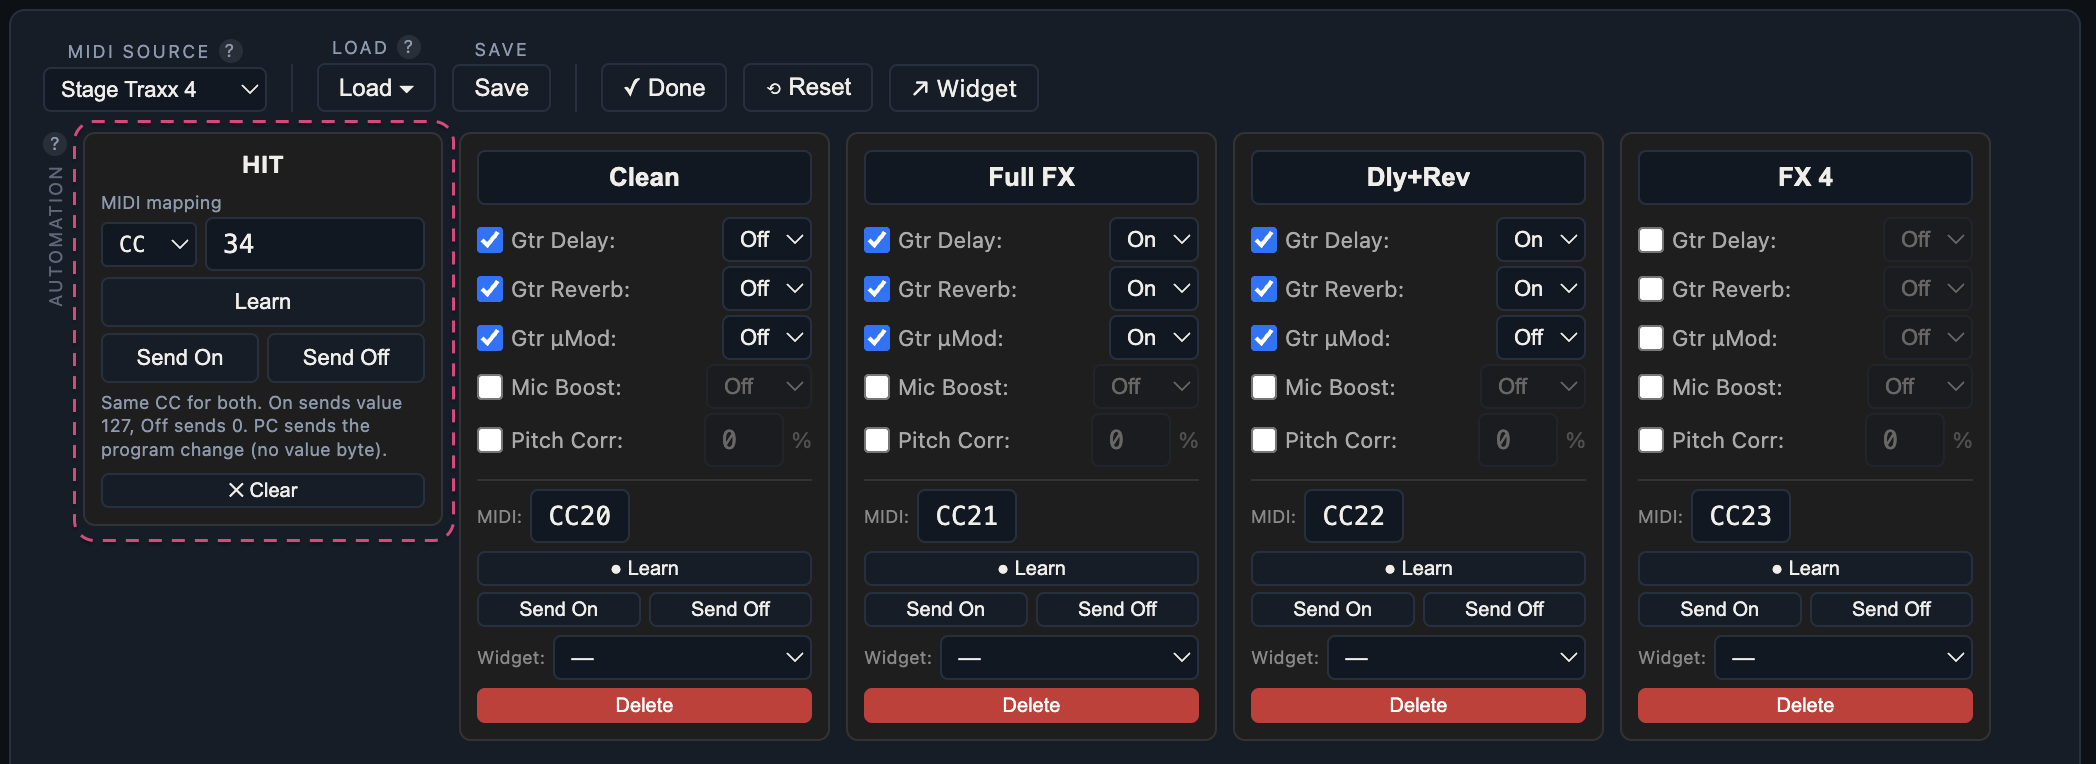
Loading the two samples (Sample Setlist + Sample Config) gives you both mappings in two clicks. After that the song body below works as-is.
[midi: PC1@1]

[Intro]

[Verse 1]
Woke up to the light through the curtain
Coffee's getting cold but I don't mind
Your voice still hums the tune from last night

[midi@00:18.00: CC34.127@1]
[Chorus]
Sunday morning sun won't let me go
Sunday morning sun is all I know
Singing to the sky, just letting go

[midi@00:34.00: CC34.0@1]
[Verse 2]
Sun on my face and a song on my lips
Hands in your hair while the morning slips
Coffee gone cold but we don't mind

[midi@00:52.00: CC34.127@1]
[Chorus]
Sunday morning sun won't let me go
Sunday morning sun is all I know
Singing to the sky, just letting go

[midi@01:08.00: CC34.0@1]
[Outro]
What this does:
- On load:
PC1@1tells the editor to load preset 2 onto the device. - At 0:18 (start of first chorus):
CC34.127@1turns HIT on — harmonies kick in. - At 0:34 (end of first chorus):
CC34.0@1turns HIT off — back to a clean lead vocal for verse 2. - Same again for chorus 2 at 0:52 / 1:08.
The next song in your setlist would start with [midi: PC2@1] (or whatever PC you've assigned to it in the editor), and so on. Stage Traxx fires the song's own MIDI tags as you cross into it.
Tips
- Place HIT triggers a beat or two early. The SysEx round-trip to the device takes a moment, so put
CC34.1270.5–1.0 seconds before the downbeat of the chorus, not exactly on it. - One immediate trigger at the top. Only the very first
[midi: …](no timestamp) fires on load. Anything else needs a@mm:ss.ms. - Channel must match. The editor listens on the MIDI channel you set in the Live Controls. If you use
@1in Stage Traxx, the editor needs to be listening on channel 1. - One CC, value as state. HIT and FX presets in the editor both use a single mapped CC with value
127for on / activate and value0for off / deactivate. There are no separate Toggle / Force-On / Force-Off mappings any more — just one CC per block, decided by value. If you set up Stage Traxx tags before that change, the on-half still works as-is (it was sending127); just re-learn the off-half from the new Send Off button so it carries value0instead. - Look at the existing setlist. The bundled Sample Setlist in the editor maps PC0–PC4 to five demo presets; pasting those PC tags into your Stage Traxx songs gets you a full automated set in a few minutes.
Where to learn more
The full Stage Traxx 4 manual covers more event types (MIDI Note, MIDI Start/Stop, SysEx, etc.) and the full editor (visualisation, looping triggers, sustained CCs, and so on). It's worth a read once you've got the basics down:
- Stage Traxx 4 — MIDI section of the manual
- Stage Traxx homepage
- Or open Stage Traxx → Settings → Help → MIDI Events for the in-app reference.
And if you're new to all this, start with the Getting Started post — it walks through the full editor + Stage Traxx setup with screenshots and a sample setlist.