
User Manual
How to connect your TC Helicon Play Acoustic or Play Electric, edit presets, run a setlist, and recover when something goes sideways. Examples below name the Play Acoustic; the same flows apply to the Play Electric except where called out.
Quick start #
If you just want to get going, here's the 60-second version. Each step links to the full explanation below.
From zero to editing a preset
- Open the editor in Chrome, Edge, or Opera. Safari and Firefox won't work — see why.
- Plug your Play Acoustic into USB and power it on.
- Click ● No device in the top bar. When the browser asks for MIDI permission, click Allow. Indicator turns green. (Help if you clicked Block by accident.)
- Toolbar → Load ▾ → From device. The editor downloads every preset and the global setup from your Play Acoustic.
- Click any preset on the left to edit it. Tweak parameters in the middle pane. Click Send to Device on that preset to push your edit, or Save ▾ → To device to push every changed preset at once.
Two things that catch most people out — read these before you spend an hour wondering why something doesn't work:
- Global settings can override your edits. If the device's setup has Global Key, Global Tempo, or Global Guitar FX on, the corresponding per-preset values are ignored. Symptom: "I changed the harmony Key, sent the preset, but the device still uses the old key."
- Sending a preset doesn't switch the device to that slot. The bytes go to slot N, but the device keeps showing whatever slot was active. Either navigate to slot N on the device's front panel, or send to the slot the device is currently sitting on.
To save your work to a file (so you can re-load it later or share it):
- Toolbar → Save ▾ → To file. The web editor uses the File System Access API — first save asks you to pick a directory, subsequent saves go there silently.
That's enough to start using the editor. Read on for everything else — including the recovery path if anything goes sideways.
Before you start: the safety net #
This manual will have you sending data to your Play Acoustic over USB. The protocol is well-tested and the editor refuses to do dangerous things when it can avoid them, but if anything ever goes wrong — failed firmware update, an unresponsive device after a power glitch, presets that mysteriously disappear — there's one move that always brings the device back to a known state.
Factory-reset the device
The Play Acoustic has a built-in hardware factory reset that's independent of the editor. Memorise it before you do anything else.
Hardware factory reset
- Power the device off (unplug USB or the power adapter).
- Hold down Store and Back together.
- While holding both buttons, power the device back on.
- Release the buttons once the screen comes up. The device boots into factory state.
This wipes all user presets and resets every global setting to factory defaults. If you've previously saved your presets to a .tch file (see Loading settings), you can re-load them after the reset.
Getting connected #
Browser support
The web editor talks to the Play Acoustic over USB using the Web MIDI API. That API is only implemented in some browsers:
| Browser | Status |
|---|---|
| Chrome (macOS, Windows, Linux) | ✓ supported |
| Edge | ✓ supported |
| Opera | ✓ supported |
| Safari (macOS) | ✗ not supported — use Chrome or Edge |
| Firefox | ✗ not supported |
| iPad / iOS via MIDIWeb Browser | ✓ supported — see iPad setup |
If you're on Safari or Firefox, the editor will load but never see the device. There's no workaround on those browsers — switch to Chrome or Edge for editing. iPad users have their own path — see Setting up on iPad with MIDIWeb Browser below.
Setting up on iPad with MIDIWeb Browser
Safari on iPad doesn't expose the Web MIDI API, so the editor can't talk to your USB MIDI interface from a normal Safari tab. The workaround is a third-party browser that does implement Web MIDI — this works for the full editor, not just Widget mode:
- Install MIDIWeb Browser from the App Store.
- Plug the Play Acoustic into the iPad (USB-C-to-USB-B cable, or via a Lightning/USB-C camera adapter for older iPads). For routing MIDI from another app like Stage Traxx into the editor, no extra cable is needed — iPadOS exposes inter-app MIDI virtually.
- Open MIDIWeb Browser and navigate to the editor URL. When prompted, grant MIDI access (see below if the prompt doesn't appear).
- From there, the editor works the same as on a desktop browser. Bookmark the page or add it to the Home Screen for one-tap launch.
If you want a touch-optimised performance view instead of the full editor UI, see Widget mode — same install steps, just a different URL.
Granting MIDI access
The first time you click Connect, your browser shows a permission prompt asking whether to allow this site to access MIDI devices and send system-exclusive messages.
First-time access
- Plug the Play Acoustic into your computer with a USB cable. Power it on.
- Open the editor.
- Click the ● No device indicator in the top bar (or anywhere the editor needs MIDI — Send, Sync, etc.).
- Your browser asks: "oddeyez.se wants to use your MIDI devices and send/receive system exclusive messages". Click Allow.
- The indicator should turn green and read ● Connected.
Once granted, the permission is remembered for this site. You won't be asked again unless you clear the site's data or reset the permission manually.
Recovering from denied MIDI access
If you accidentally clicked Block on the permission prompt — or if it's the second time you're trying and the prompt isn't reappearing — the browser has remembered your denial. The editor can't trigger the prompt again on its own; you have to reset the permission manually.
Reset MIDI permission in Chrome / Edge
- Open the editor (oddeyez.se/app).
- Click the tune-icon (or padlock) at the very left of the URL bar, next to the site name.
- In the popup, find MIDI devices in the permissions list.
- Set its dropdown to Ask (default), or click the small reset arrow.
- Reload the page (Cmd+R / Ctrl+R) and click Connect again. The prompt reappears.
Alternatively: open chrome://settings/content/midiDevices (Edge: edge://settings/content/midiDevices), find the entry for oddeyez.se, and remove it. The next visit will re-prompt.
Connecting the device
- USB cable from your computer to the back of the Play Acoustic. A normal USB-A-to-Mini-USB cable works; the device powers from USB.
- Power the device on (the front knob).
- Open the editor and click ● No device in the top bar.
The editor auto-connects on subsequent visits — once you've granted MIDI permission, just keeping the device plugged in is enough.
Troubleshooting: device shows "Not found"
If the indicator stays red after clicking Connect, work through these in order:
- Check the cable. Some USB-A-to-Mini-USB cables only carry power, not data. Try a different cable.
- Power-cycle the device. Switch it off and back on. The editor's MIDI port can go stale if the device was unplugged while connected.
- Reload the page (Cmd+R). Web MIDI's port list is fetched at page load; if the device wasn't plugged in then, it won't appear until reload.
- Close other apps that might be holding the port. VoiceSupport 2 or another DAW that has the device's MIDI port open will block the editor. Quit them and try again.
- Check the OS sees the device.
- macOS: Open Audio MIDI Setup → Window → Show MIDI Studio. The Play Acoustic should appear there.
- Windows: Open Device Manager → Sound, video and game controllers. The device should show up.
- Verify MIDI permission is granted (see above). A "denied" state silently produces "no device" symptoms.
Updating firmware #
Firmware updates are infrequent (TC Helicon stopped supporting the device years ago — see About) but the editor can flash any of the firmware versions TC Helicon released, plus restore an older one if a newer build introduces a regression. Worth doing once when you first set up so you know the device is on a known version, then forgetting about it.
The editor bundles all five known firmware versions for the Play Acoustic — pick from the dropdown in the Firmware Manager. The web version (oddeyez.se/app/) supports firmware updates; the same code runs in both the web and desktop builds.
Update firmware
- Connect the device. Verify the indicator is green.
- Open the Firmware Manager (banner at the top when the device is on a different version, or click the Firmware Manager option from the menu).
- Pick a version from the Flash Firmware dropdown. If you have your own .syx outside the bundled set, the file picker mode also accepts uploaded files.
- Click Flash selected. The editor first downloads every preset and the global setup as a safety-net backup .tch file. Don't skip this.
- Watch the progress bar. While the update is running:
- Don't disconnect the device.
- Don't navigate away from the editor page or close the tab. The browser will warn you if you try; closing anyway leaves the device in an unknown state.
- After the bytes finish sending, the device may take up to a minute to reboot. Keep the page open and the device powered until the editor reconnects automatically.
Where the safety-net backup goes
Every firmware update writes a backup before flashing. Filename is pre-firmware-YYYY-MM-DD_HH-MM-SS.tch — easy to spot.
- If you've picked a data directory (via FS API, on first save in the editor): the backup goes there alongside your other .tch files.
- If not: the editor falls back to a regular browser download — the file lands in your default Downloads folder. The banner spells out which one happened so you know where to look.
The fallback exists because Web FS API's directory picker can only be triggered from a click handler, and by the time the firmware backup runs we've already spent several seconds downloading presets — gesture context is gone. The Blob-download path always works.
Recovery if the update fails
If the device becomes unresponsive after a failed firmware update:
- Try a factory reset first (see above). The device's hardware-level recovery often boots cleanly even if the firmware was halfway updated.
- If the factory reset succeeds, reconnect the editor and try the update again — but with a known-good firmware file.
- If the device still won't boot, you may have a partial firmware that the bootloader can't recover from. The Firmware Manager has a "Force flash" option that bypasses the editor's normal safety checks. Use it carefully and with a known-good firmware file.
- Once the device is back, restore your presets from the backup .tch the editor saved before the update started — open it via Load ▾ → From file…, then send everything to the device.
Loading settings #
The editor works on a file in memory — a collection of presets and global setup. You populate that file from one of three sources:
From the device
Pulls every preset slot and the global setup off the connected Play Acoustic. This is the round-trip flow: download → edit → upload.
Download from device
- Make sure the device is connected (top-bar indicator is green).
- Top toolbar → Load ▾ → From device.
- Wait — the editor scans every preset slot. Progress bar shows "Slot N/255 — X presets, Y empty".
- When done, the preset list on the left fills up.
From a .tch file
The editor's native format. Each .tch file holds a complete preset bank plus the global setup, so you can switch between "venue setups", "song setups", and so on.
Load from disk
- Top toolbar → Load ▾ → From file…
- Pick a .tch file from your computer.
- The editor parses it and shows the presets.
The web editor uses the File System Access API: the first time you save, it asks you to pick a directory to keep your saved files in. Subsequent saves and loads from that directory don't re-prompt.
From a built-in preset pack
The editor ships with a few packs you can use as a starting point:
- Sample Presets — five presets covering the most common vocal/guitar combinations. Used by the Stage Traxx walkthrough.
- VoiceLive Play Factory Bank — the original factory bank from TC Helicon.
- Play Acoustic Factory — the Play Acoustic factory presets (formerly "TCHPA Factory").
- Play Electric Factory — the Play Electric factory presets.
- 500 Mega Pack — a community-curated 500-preset pack.
Load a pack
- Top toolbar → Load ▾.
- Scroll down to the Preset Packs section.
- Click any pack to load it. Your in-memory preset list is replaced.
Global settings & the override trap #
Three toggles in the device's setup can silently override what you've set per-preset. This is the single biggest source of "I changed it in the editor but the device isn't responding to my change" confusion — so worth understanding up front.
Conceptually: every preset stores its own values for things like harmony Key, delay Tempo, and the guitar FX block on/off + style. But the device has three master switches that, when on, ignore the preset's value and read from a single global byte instead. Switching presets doesn't change anything those switches govern.
Find them in the device's setup menu (or in the editor's Setup tab → Device / Guitar sections):
Global Key
What it is: the harmony Key parameter (C, C#, D, …) used to drive auto-harmony.
Off (default): each preset stores its own Key. Switching presets changes the key — useful when you've curated each song to its key.
On: the Key is read from a single setup byte. Switching presets has no effect on it. You'd typically use this if you want one fixed key for an entire setlist — e.g., everything in C Major — and don't want to worry about per-preset key drift.
Global Tempo
What it is: the BPM that drives all tempo-synced delay timings (Quarter, Eighth, Triplet, Dotted, etc.). Tempo is shared between vocal and guitar delays — there is only one BPM in the device.
Off (default): each preset stores its own BPM. The Time L/R values for tempo-synced delay styles recompute when you switch presets.
On: a single global BPM applies across all presets. Useful for setlists where every song is around the same tempo, or if you want the tap-tempo footswitch to set a tempo that survives preset changes.
Global Guitar FX
This one is the trickiest because it has multiple side-effects. What it is: a master switch deciding whether the guitar FX blocks (BodyRez, Reverb, Delay, µMod) are per-preset or shared.
Off (default): each preset has its own guitar FX state — Style, Time, Feedback, Filter, BodyRez Custom values, etc. live in the preset bytes. Switching presets changes the guitar sound.
On: a single set of guitar FX values in setup is shared across all presets. Switching presets doesn't change the guitar sound.
- When Global Guitar FX is Off, the setup-side guitar FX bytes become read-only. Writes via SysEx are silently dropped. The preset bytes are what's effective. So if you're editing Setup → Guitar Delay Style and nothing seems to happen on the device, this is why — the setup-side bytes only matter when the global toggle is on.
- Toggling On → Off resets the setup-side BodyRez Custom values to factory defaults. So if you've spent time fine-tuning the setup-side BodyRez Comp/EQ/Ambience, then flip Global Guitar FX off, that work is gone. The preset-side values aren't affected.
- Loading a preset can change the global guitar FX block enables. When a preset loads, it sets the guitar effect block enables (Delay on/off, Reverb on/off, µMod on/off) in the global setup. So even when you're using one shared guitar FX setup, the per-preset "is this block enabled" still gets stored.
Which mode should you use?
- Per-song guitar tones: Global Guitar FX off. You curate each preset with the guitar treatment you want for that song. This is what most users want.
- One guitar tone for the whole gig: Global Guitar FX on. Pick the perfect BodyRez/reverb/delay once in setup, leave it. Preset switches only change vocal FX.
Spotting "global override is biting me"
The fastest way to diagnose whether a global toggle is the problem:
- Make a deliberate change to one of the three params (e.g. Harmony Key in a preset).
- Send the preset to the device.
- Switch away on the device, then back to that preset.
- Check the device's display.
If the change is on the device → you're fine. If the device shows the old value → the corresponding global toggle (Key / Tempo / Guitar FX) is on. Check setup.
Presets tab #
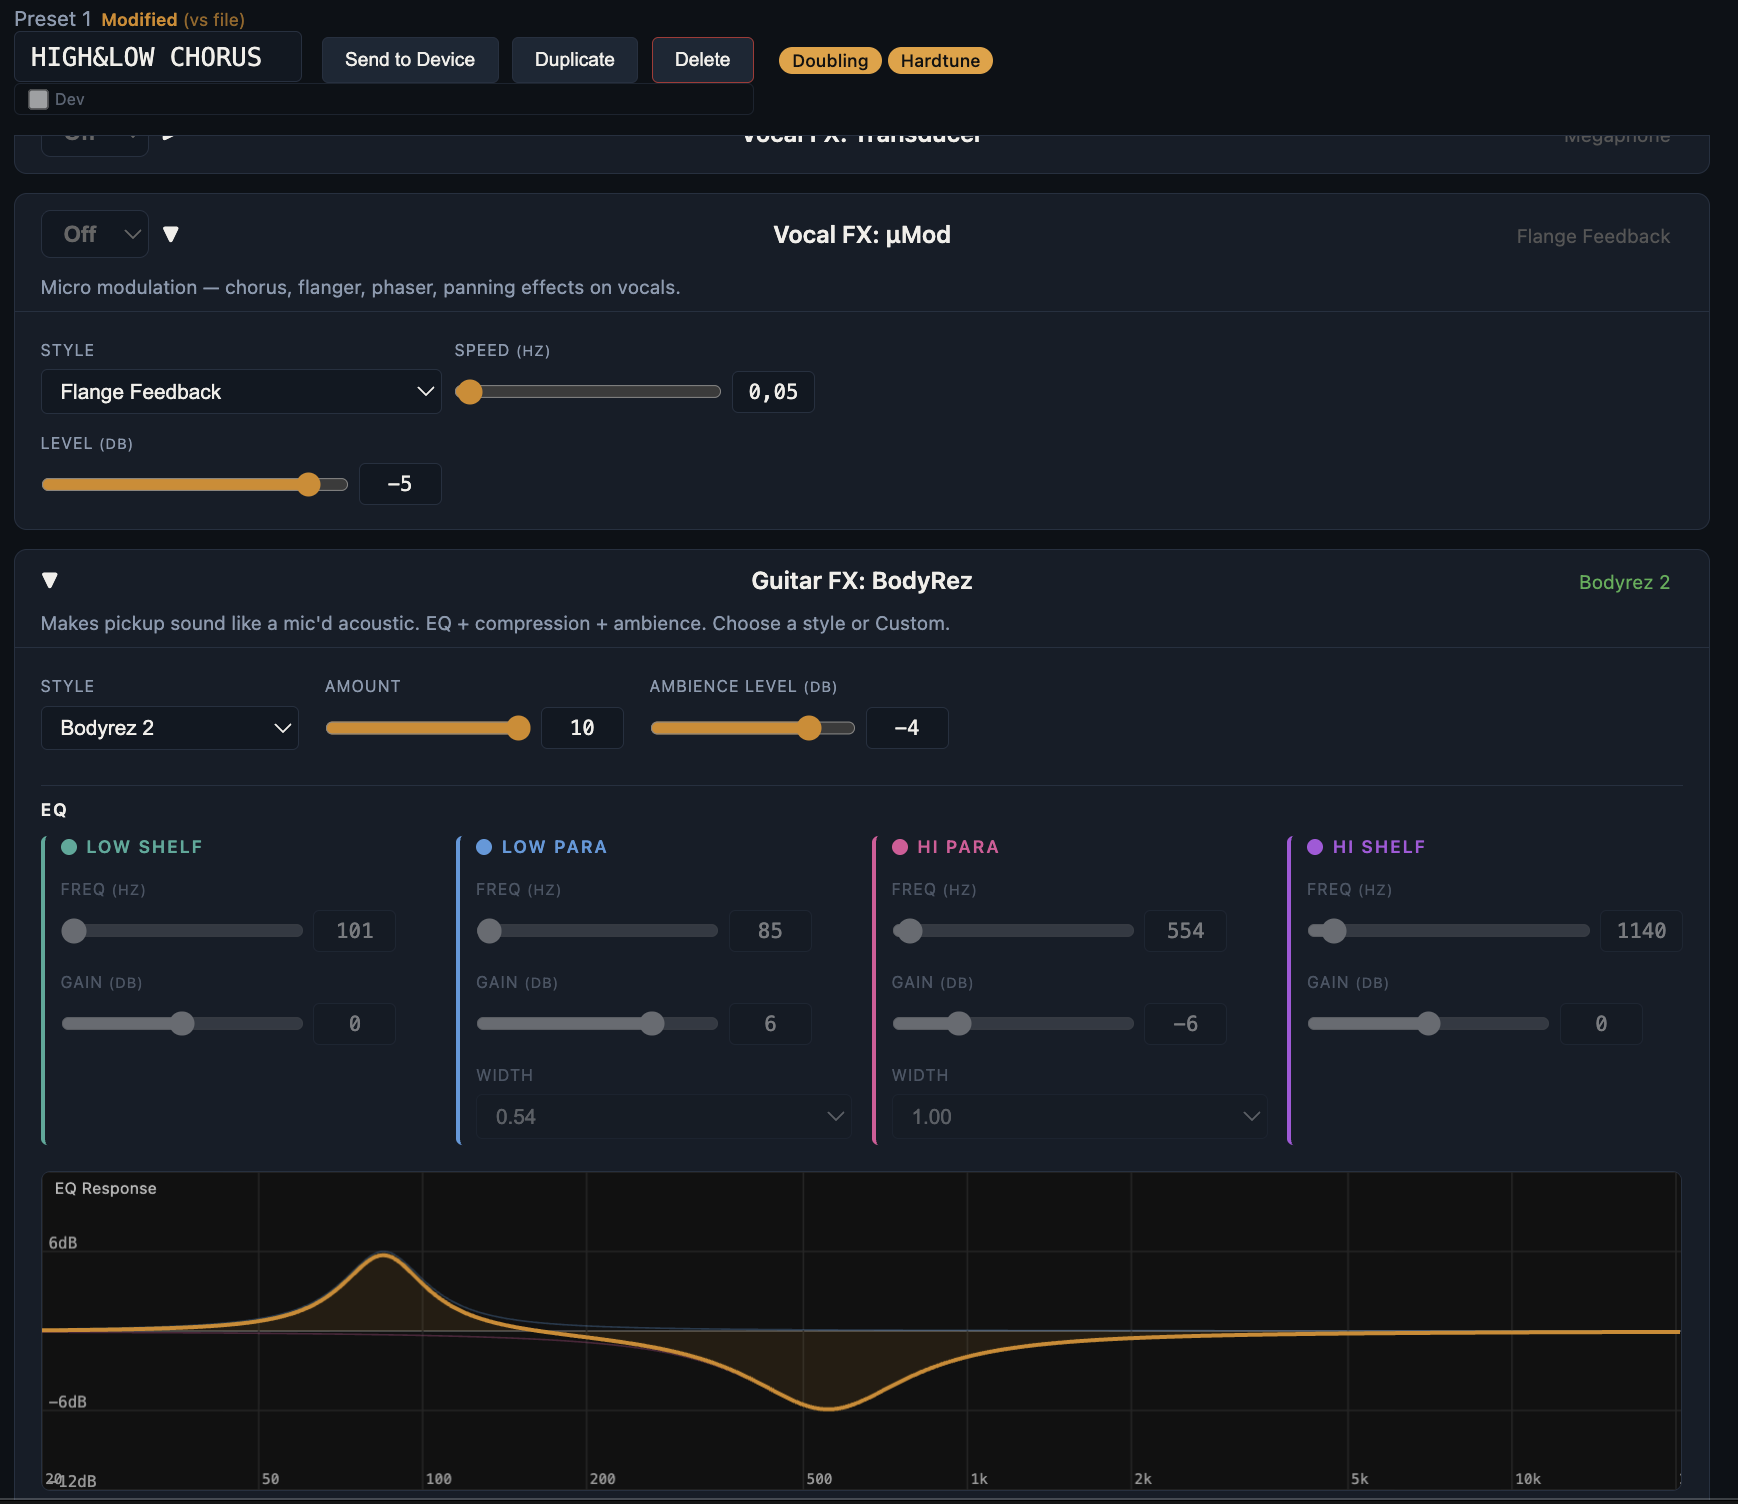
Where you spend most of your time. The left column lists every preset in the loaded file; click one to load it into the editor. The middle pane is the parameter editor.
Top toolbar
- Load ▾ — file, device, or built-in pack (covered above).
- Save ▾ — to file (saves the .tch), to device (sends presets that have changed since last load).
- Snapshot Save / Restore — local-only quick undo. Snapshots the current in-memory state; doesn't touch the device or file.
- Preset selector — jump to any slot in the file. New creates an empty preset.
Parameter sections
Each section (Vocal FX: Harmony, Guitar FX: BodyRez, etc.) is a collapsible card. Click the title bar to expand. The leftmost dropdown sets the section's overall state — Off, On, or HIT (only triggered when the HIT button is engaged).
For details on what every parameter does, hover the ? icon next to the section title for a help tooltip.
Vocal FX sections
- Harmony — automatic harmony voices. Style picks the interval pattern; Key + Scale set the musical context. Humanize and Portamento humanise the voice timing/pitch.
- Double — adds doubling voices below or above the lead.
- Delay — vocal echo. Style picks the timing pattern (eighth, dotted, ping-pong, etc.). For Classic Slap and Set Time, you set Time L/R directly in ms; the others are tempo-synced.
- Reverb — vocal reverb. Style + Decay.
- HardTune — tuning correction (subtle to extreme). Shift sets the pitch offset; Gender alters formant.
- Transducer — megaphone / lo-fi character effect. Style + Drive + Filter.
- µMod — chorus, flanger, etc. Style + Speed.
Guitar FX sections
- BodyRez — pickup-to-mic'd-acoustic conversion. Pick a Style preset, or use Custom + the EQ / Compressor / Ambience sub-controls. The 4-column EQ shows Low Shelf, Low Para, Hi Para, Hi Shelf with a real-time graph below.
- Reverb — guitar reverb. Style + Decay + Pre-delay.
- Delay — guitar delay. 16 styles including tempo-synced (Quarter, Eighth, etc.) and fixed-time (Flashback 2290, 300ms). For tempo-synced styles Time L/R is computed from BPM and shown read-only.
- µMod — guitar chorus / detune.
Sending a preset
Two ways to send to the device:
- Send to Device button on a single preset (the small one above the parameter editor) — sends that one preset to its slot.
- Save ▾ → To device from the top toolbar — sends every preset that's been changed since the last load.
The device doesn't switch to the slot you just sent — it stays on whatever preset is currently active. Navigate there on the device's front panel, or send to the slot the device is currently sitting on, to hear the change.
Arrange tab #
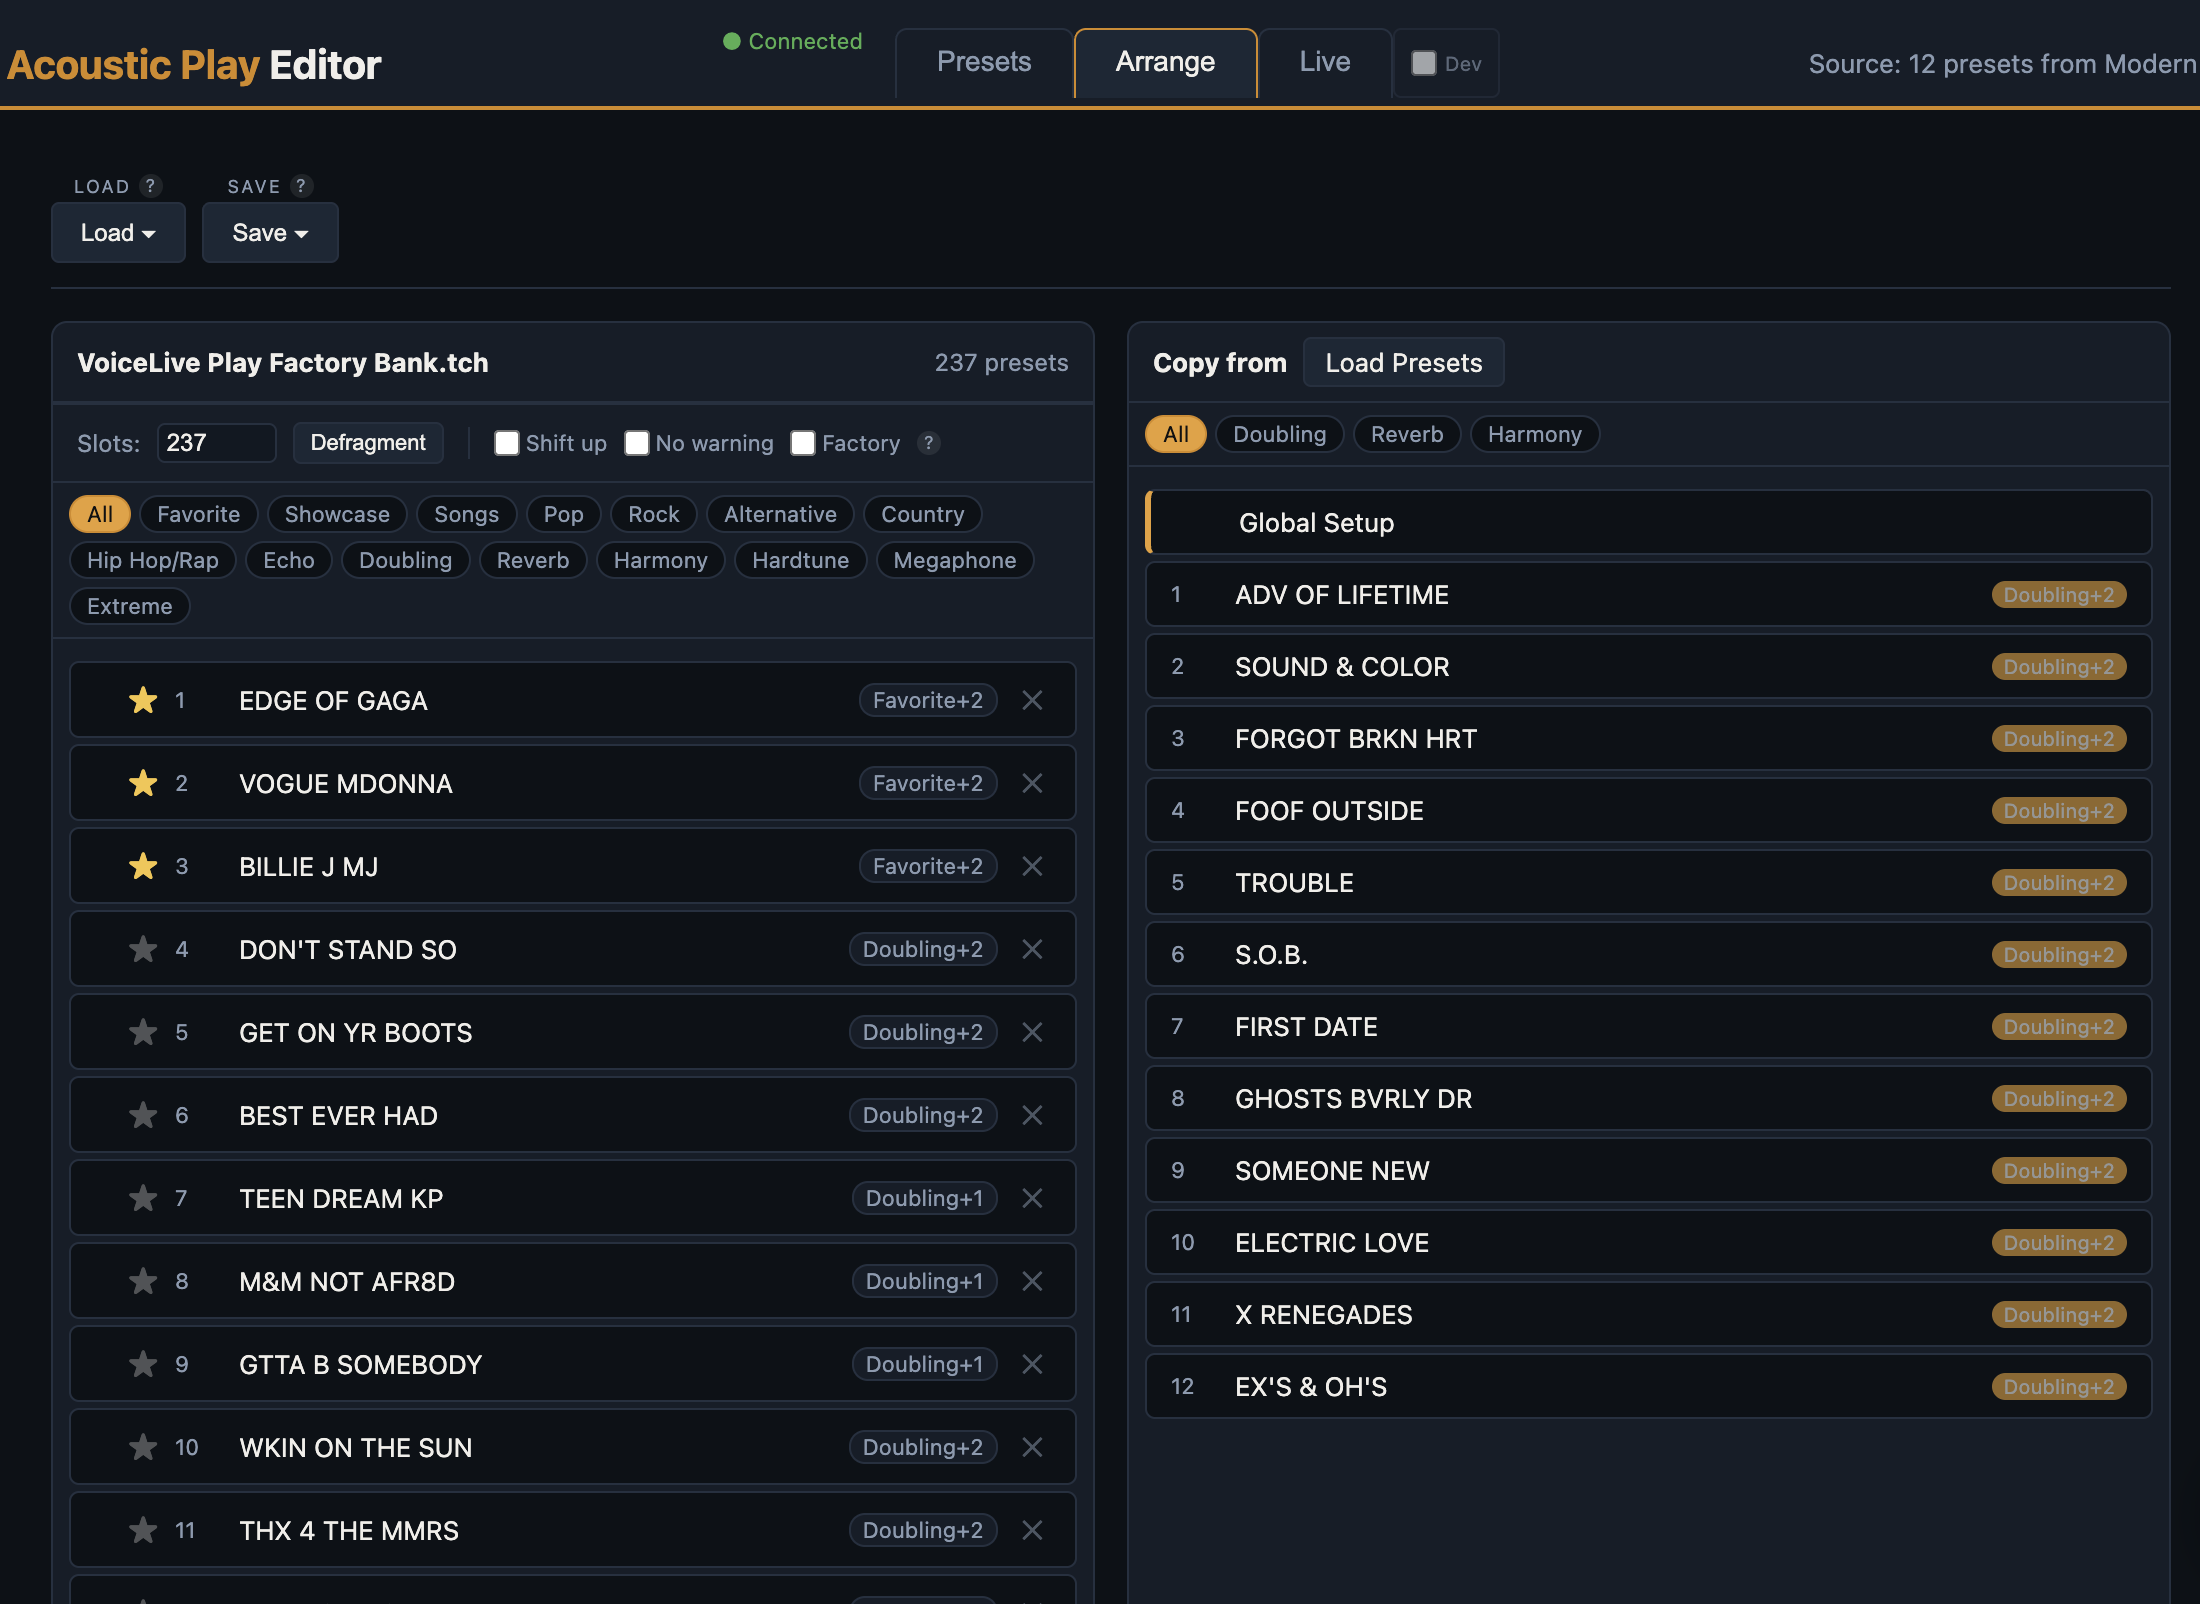
For organising the order of your preset bank before a gig — without editing parameters.
- Drag a preset by the handle on its left to reorder.
- Duplicate a preset to copy it to the next free slot.
- Delete empty unused slots.
- Defragment — packs all presets to the top, removing gaps. Useful before sending the whole bank to the device.
- Import from another file — pull individual presets in from a different .tch without replacing your current bank.
Same Load / Save / Send-to-device flow as the Presets tab.
Live tab #
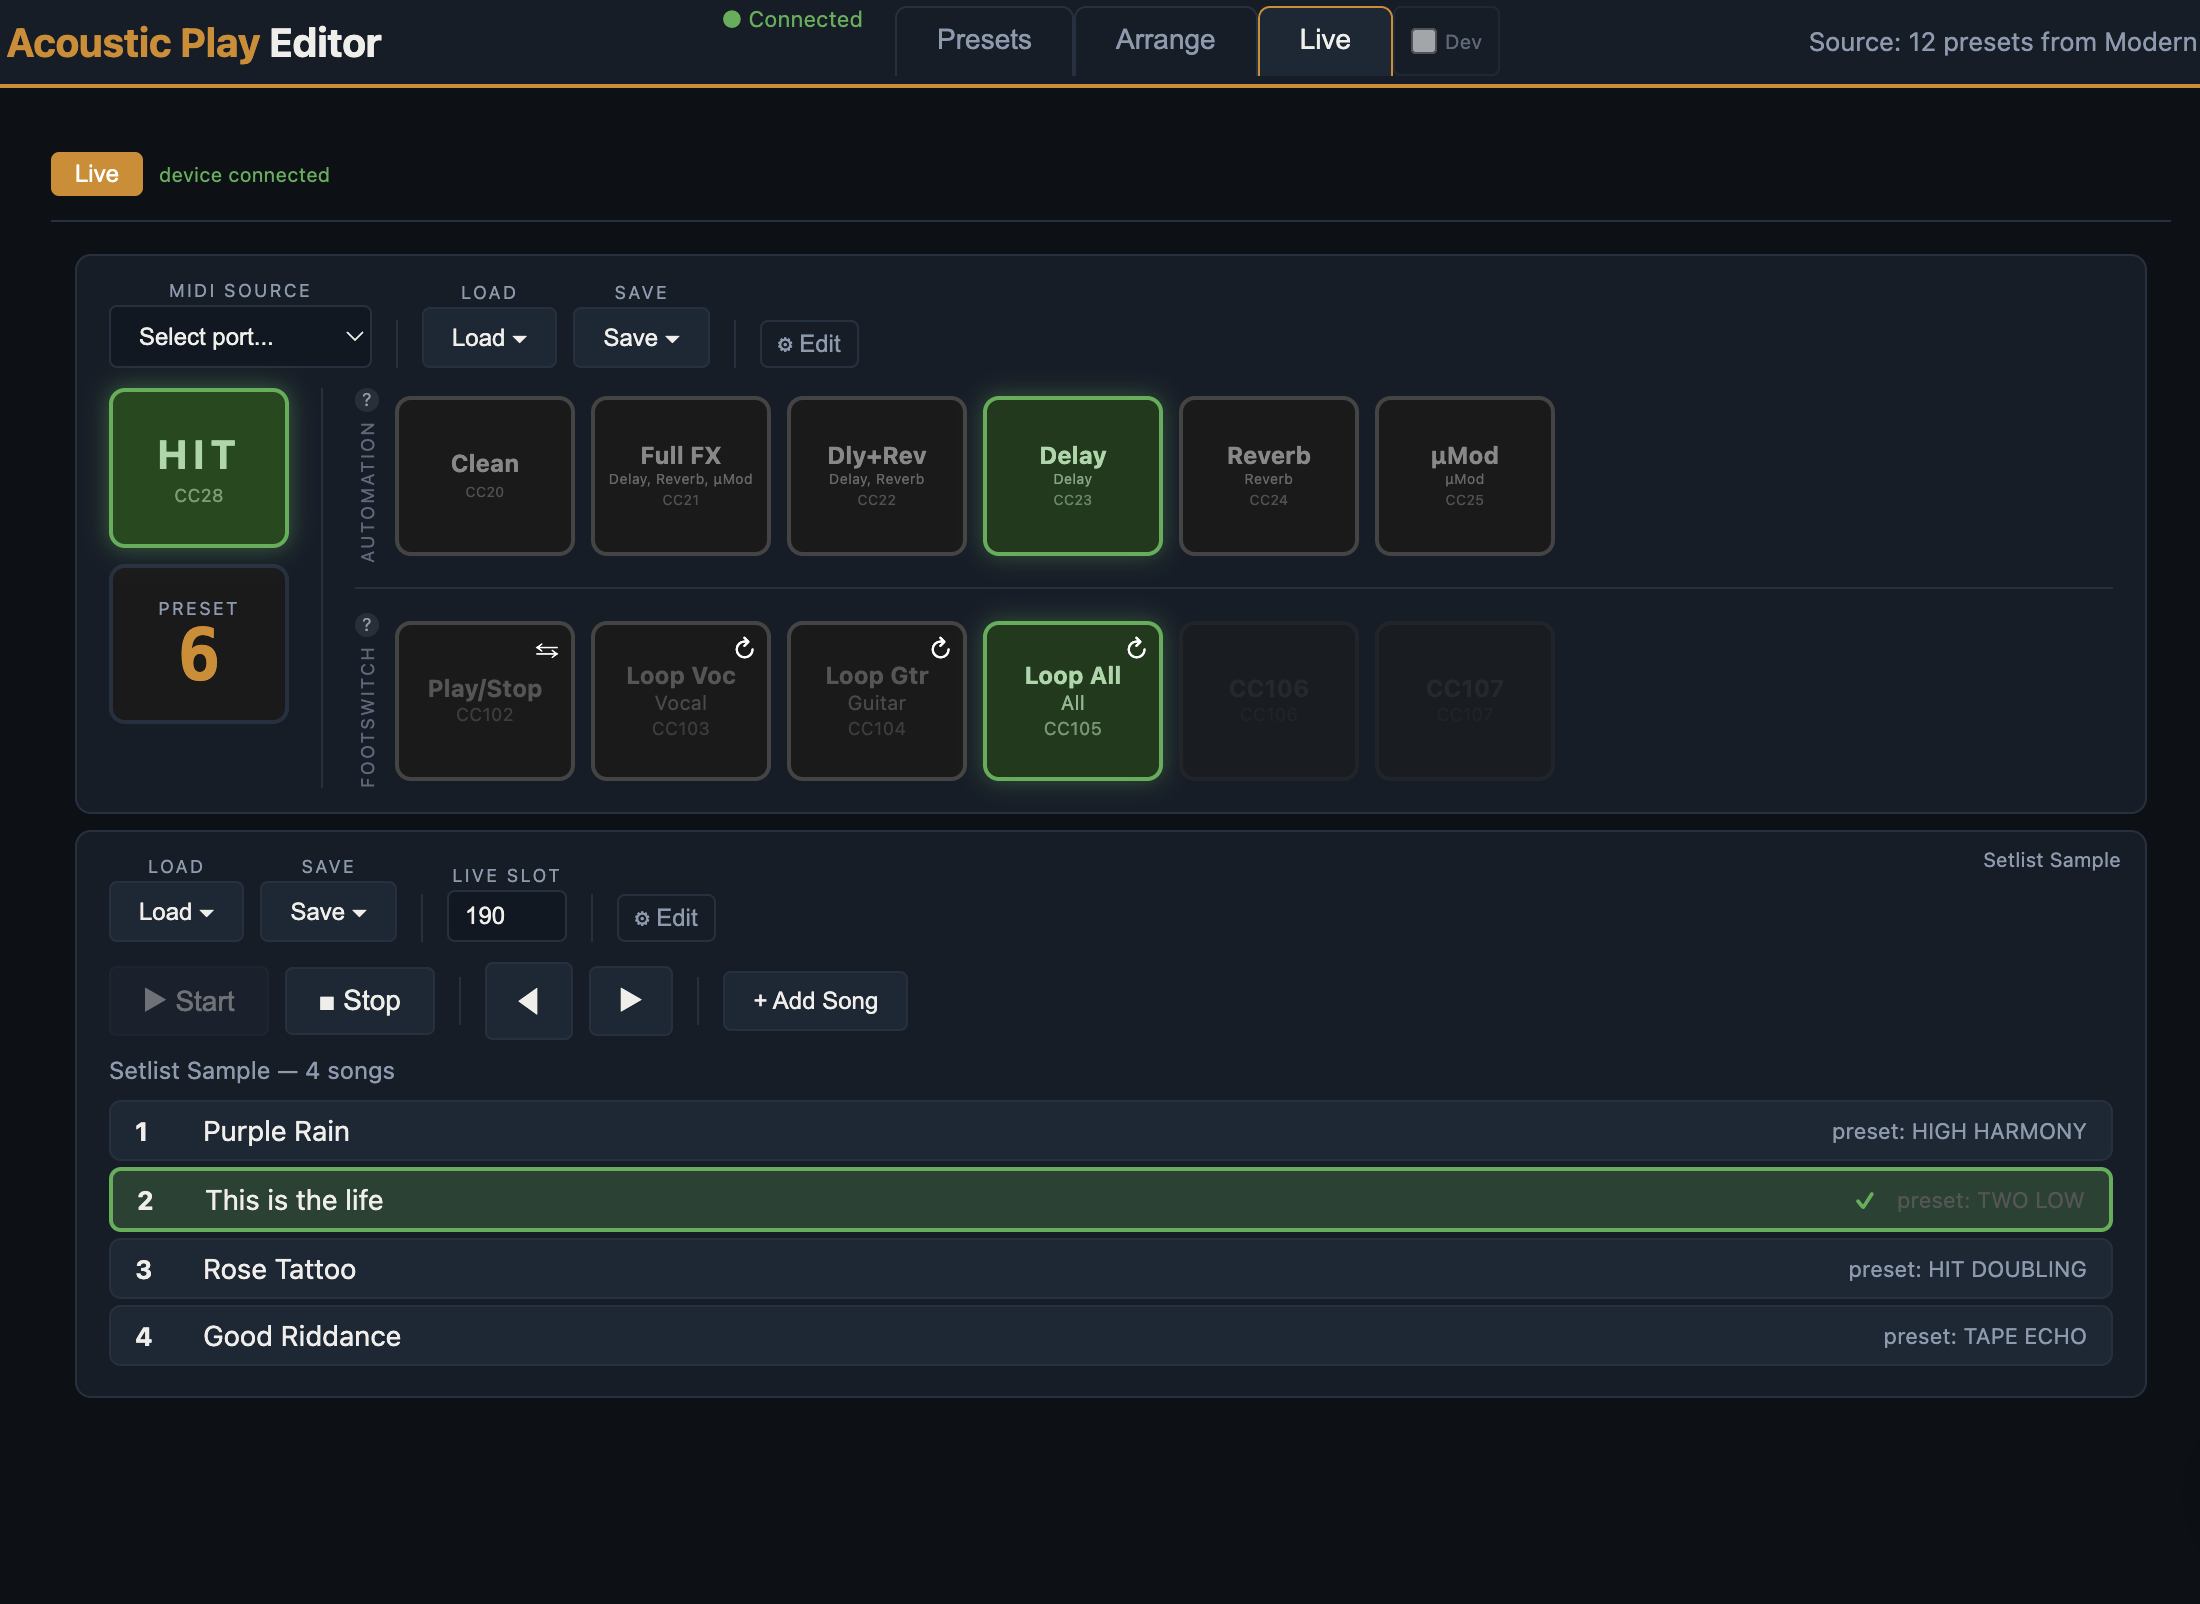
For performance: real-time control over the device, automation from MIDI controllers (Stage Traxx, OnSong), and a setlist that switches presets per song.
The end-to-end flow looks like this: your lyrics app (Stage Traxx, OnSong, SongBook) sends a MIDI Program Change as each song starts. The editor matches the PC to the song's row in the setlist and pushes that song's preset — plus any per-song Key/Scale/BPM override — to the device's live slot, so the correct vocal harmonies, reverb, delay, and guitar effects are loaded before the first downbeat. You don't have to scroll the device knob between songs.
During the song, the same lyrics app can send MIDI CCs at scripted moments — lift the harmony into the chorus, kick on a longer delay, toggle a guitar Boost — and the editor translates those CCs into HIT toggles or FX-block triggers on the device. Mappings are configured below in HIT MIDI mapping and FX presets. Result: a hands-free, foot-pedal-optional performance where lyrics, preset switching, and within-song effects all advance off a single source of truth.
Device panel (top)
Shows the live state of the device — current preset slot, HIT button state, FX block enables, footswitch activity. Click the HIT button to toggle harmony manually. Click the ⚙ Edit button to configure MIDI mappings (see below).
HIT MIDI mapping
In Edit mode, you can map up to three MIDI commands that control HIT remotely:
- Toggle — flips HIT on/off.
- Force On — sets HIT on (no-op if already on).
- Force Off — sets HIT off.
For each row you can either:
- Type the MIDI command directly (CC dropdown + number, e.g. CC 28).
- Learn — click Learn, then send the MIDI message you want from another app. The editor captures it.
- Send — sends the configured CC/PC out to the setlist port (useful for letting the other app learn your message).
Footswitches
The Play Acoustic accepts an optional external footswitch on the back-panel jack — either a Switch-3 (3 buttons) or Switch-6 (6 buttons). The Live tab shows footswitch presses in real time so you can verify your wiring without crouching down to look at the device.
Each button's function is configured in Setup → Controls:
- Switch-3 has two preset modes — Loop (Loop Rec/Play, Loop Stop/Erase, Loop Undo) and Custom where you assign each button individually.
- Switch-6 has three preset modes — Default, Guitar (Boost / Phase / µMod / Delay / Reverb / HIT), and Custom.
The full function list each button can take on includes loop transport, tap tempo, every effect block toggle (Harmony, Delay, µMod, Transducer, HardTune, Doubling, Reverb, Guitar Boost / Phase / µMod / Delay / Reverb), Set Key, HIT, Preset Up/Down, and six raw MIDI CCs (CC102–CC107) you can route into your DAW or another app.
FX presets
Quick toggles for activating effect blocks during performance. Each FX preset can map to a MIDI CC so an external app (or one of your footswitch CC102–107 assignments) triggers it.
Setlist & per-song overrides
Define a list of songs, each linked to a preset slot. When a song is selected (manually or via incoming MIDI Program Change), the editor sends that preset to the device's live slot (default 190 — empty by default; the device should be parked there during performance).
For each song in the list you can also override Key, Scale, and BPM independently of what's stored in the source preset. That means you can use one favourite preset across multiple songs and just adapt the harmony key + tempo per song — no need to clone "HIGH&LOW CHORUS" five times for five different keys. The override happens at send time: when the song is triggered, the editor copies the preset bytes to the live slot, then patches in the song's Key/Scale/BPM before sending.
For an end-to-end walkthrough including Stage Traxx integration, see Getting Started — Automate Song Changes and HIT with Stage Traxx.
SysEx latency & planning
The Play Acoustic doesn't support fast preset switching the way most MIDI gear does — it doesn't accept a "switch to preset N" command. Instead, the editor has to send the entire preset (a 32-byte header + five 110-byte data packets, plus begin/end-sync wrapping) every time you change songs.
End-to-end timing for a single preset send is around 500–800 ms: 50 ms wake / sync, ~250 ms wire transmission for 6 packets at MIDI baud, 30 ms gaps between packets, and the device's own ACK round-trip. Setup writes are slower still — 7 packets back-to-back plus an ACK.
What this means in practice:
- Trigger song changes 1–2 beats before the downbeat, especially if the next song needs a different vocal effect chain. The device only switches once it's processed the full incoming preset.
- HIT toggles are fast — single CC, sub-100 ms. Use those for transitions within a song.
- Don't queue rapid preset changes — back-to-back preset sends step on each other if you fire them faster than ~1 per second.
- Tap tempo on the device's footswitch updates immediately, no SysEx round-trip. If you need real-time tempo control during a song, that's the path — preset/setlist tempo overrides happen at preset-load time, not in real-time.
Widget mode (iPad live view) #
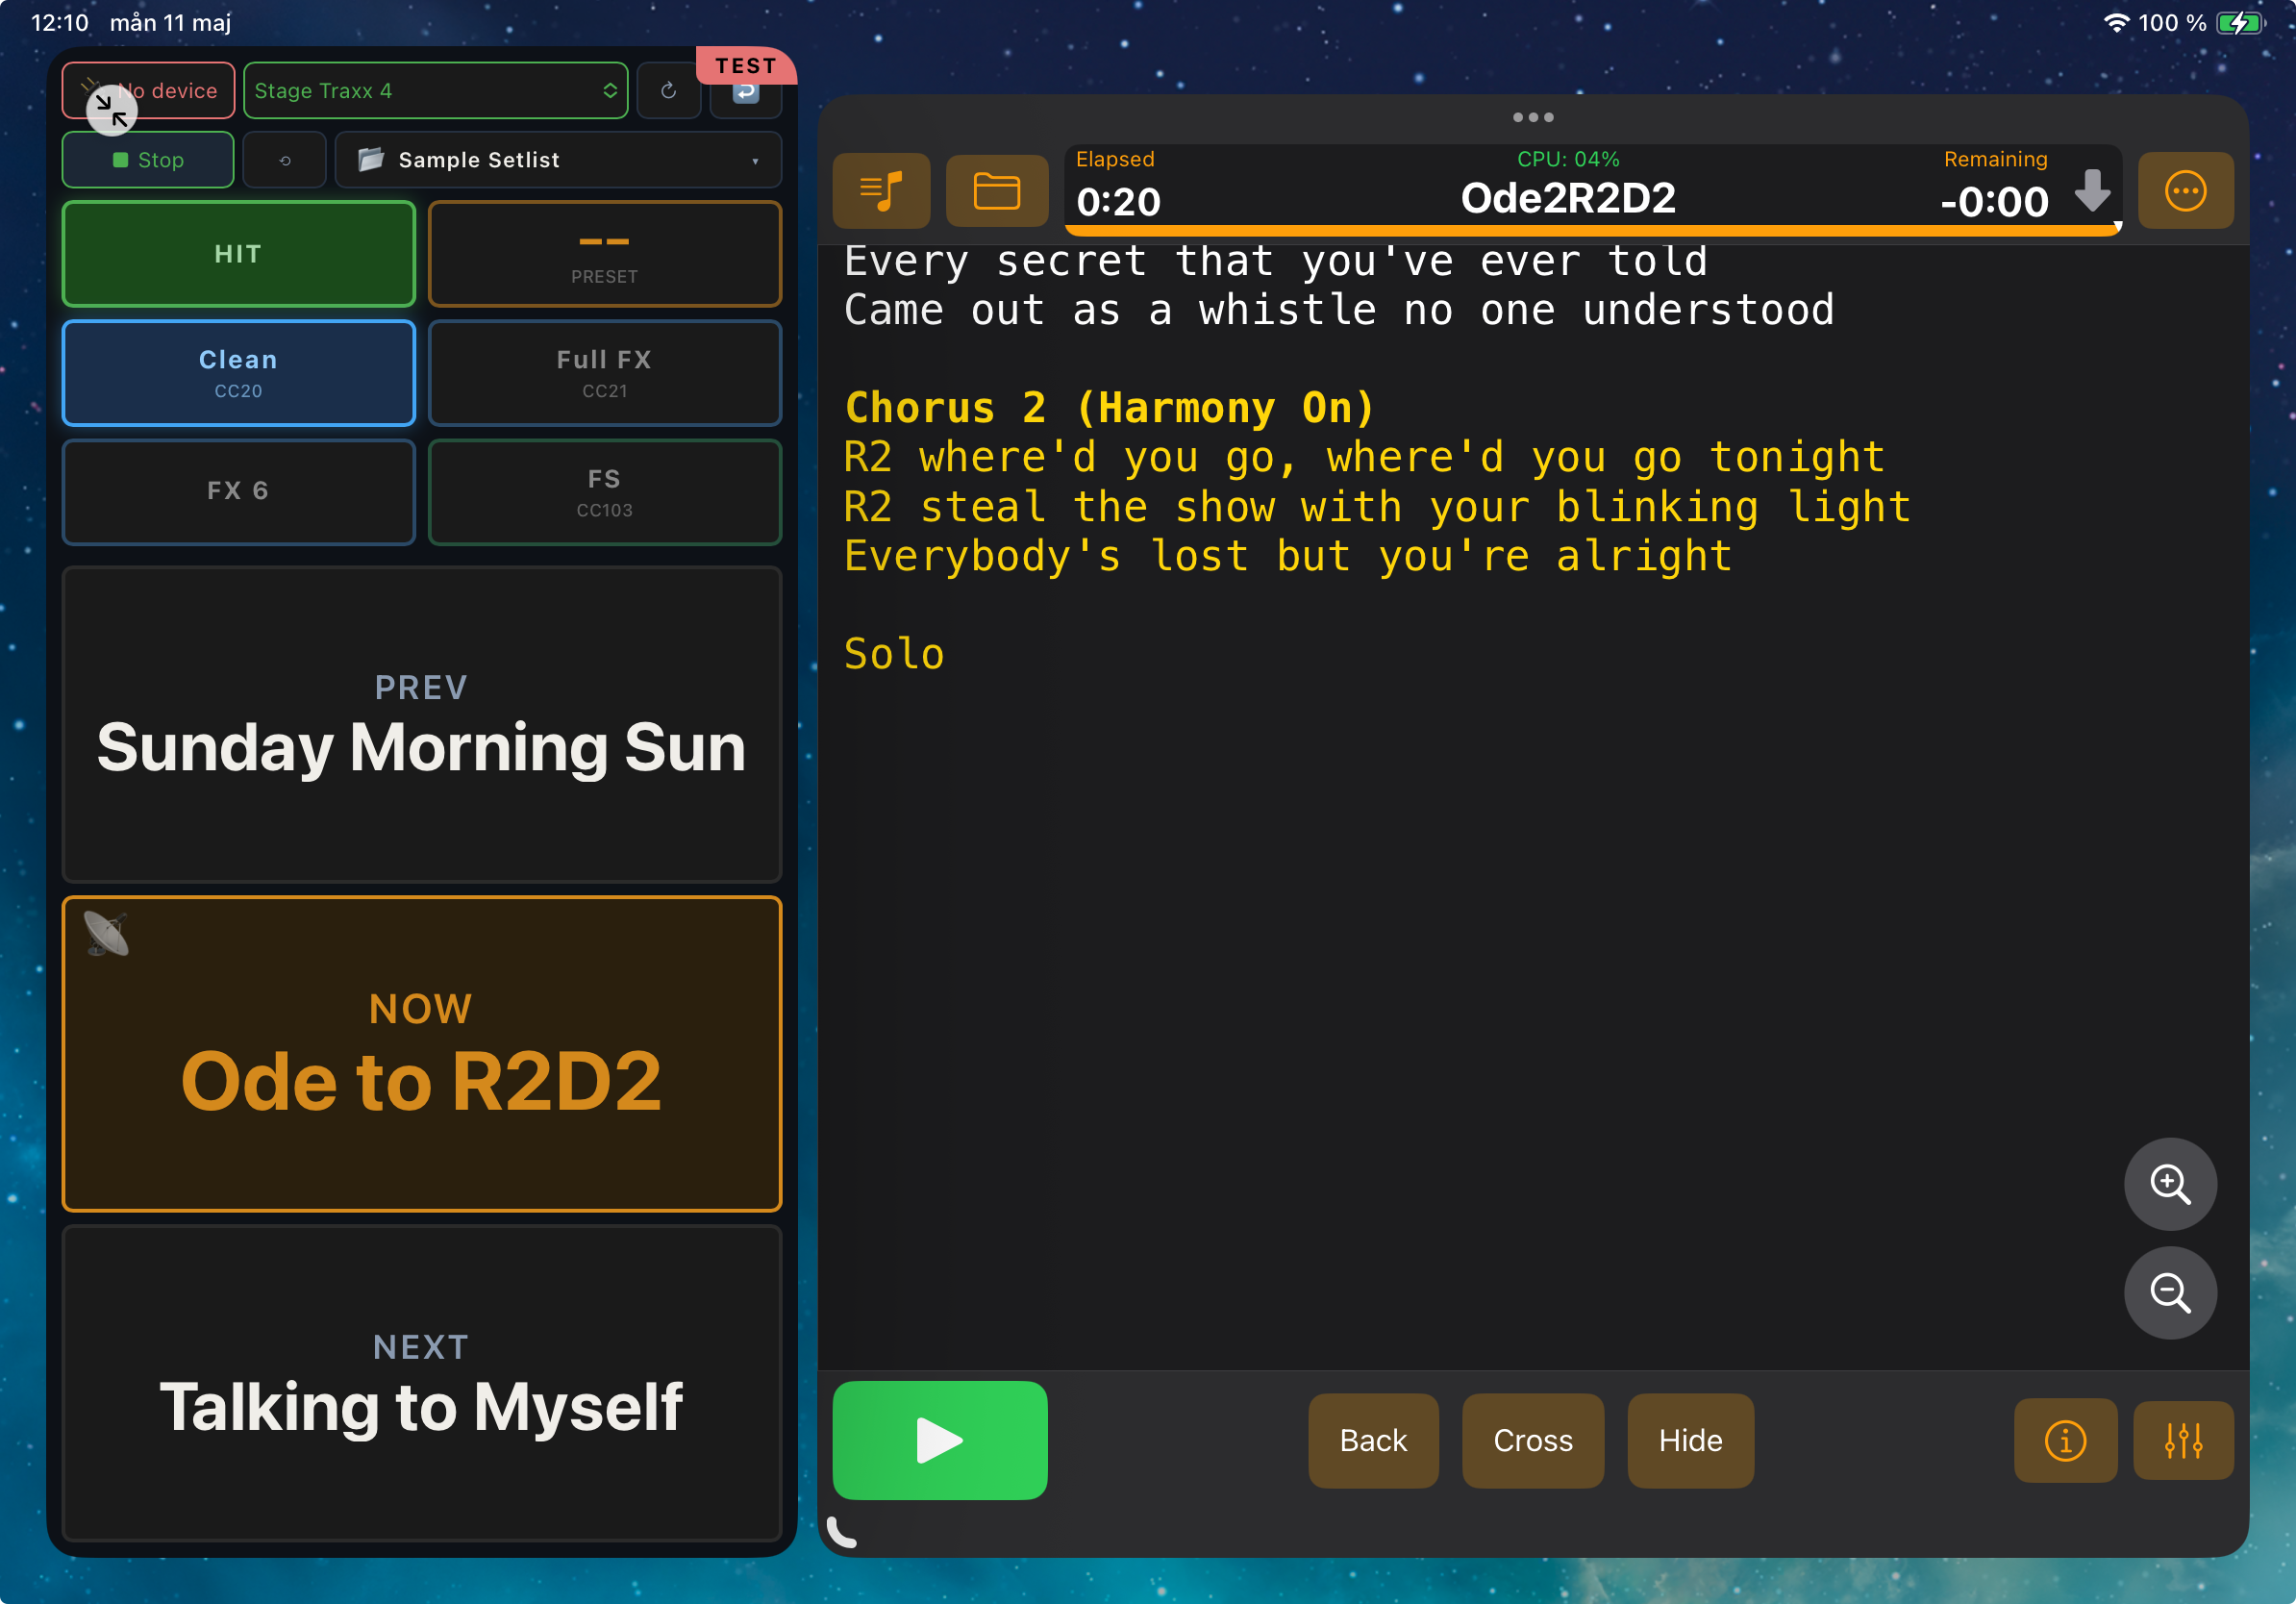
Widget mode is a stripped-down, touch-friendly view of the editor designed to sit next to a lyrics app (OnSong, Stage Traxx, SongBook, etc.) in iPad Split View. It exposes only the things you actually press during a song — a HIT button, a preset display, four configurable slots, and a song list — and keeps the rest of the editor out of the way.
You can open it at any time from the editor's Live tab via the 📱 Widget link, or go directly to ?mode=widget in the URL. On iPad, install MIDIWeb Browser first — see Setting up on iPad with MIDIWeb Browser.
Widget layout
From top to bottom:
- Toolbar — device-connect pill, MIDI source picker for incoming triggers, refresh button, and a back-arrow to return to the full editor.
- Transport row — Start / Stop (one toggle that arms the widget to listen for incoming MIDI program changes / CCs), Reset (re-sends the current preset and clears any latched FX/HIT state), and a Setlist loader (load from file, samples, or recent).
- HIT + Preset row — the HIT toggle (with its mapped CC shown as a sub-label, e.g.
CC28) and the current preset name. - Four slot buttons — each one fires either an FX preset or a footswitch CC, depending on how it's configured (see below).
- Song stack — the previous, current, and next song from the loaded setlist. The active song is highlighted, has a pulsing 📡 "live" icon in its top-left corner, and shows the song name in large centered text. Tap a song to jump to it.
The four slots
The widget exposes exactly four programmable slots. Each slot can hold either an FX preset or a footswitch — never both. This keeps the surface predictable across songs while still letting you customise which four actions you actually need on stage.
Slots are configured in the editor's Live tab, in Edit mode:
- Open the editor (not the widget) and switch to the Live tab.
- Click ⚙ Edit.
- On any FX preset or footswitch row, use the Widget: Slot 1 / 2 / 3 / 4 dropdown to assign it to a widget slot. Assignments are mutually exclusive — assigning a new entry to a slot automatically clears whatever was there before, whether it was an FX preset or a footswitch.
- Exit Edit mode. The widget will pick up the new assignments next time it loads (or on a refresh).
Slot assignments are stored in browser localStorage on the device running the widget, so the iPad and the editor PC keep independent configurations. Set them up once on the iPad after you've decided which four actions you want during a gig.
Side-by-side with OnSong / Stage Traxx
Widget mode is designed for horizontal (landscape) iPad orientation. iPadOS Split View gives each app a fixed share of the screen, and in landscape that share is wide enough that your lyrics app gets a usable column for chord charts while the widget sits as a tall, narrow control strip on the other side. In portrait, Split View squashes both apps so much that lyrics become unreadable — landscape is the only practical layout.
A typical setup:
- Lyrics app (OnSong / Stage Traxx / SongBook) taking ~70% of the screen on the left.
- MIDIWeb Browser with the widget taking ~30% on the right.
- Stage Traxx sending program changes to advance songs in the widget, and CCs to toggle HIT / fire slot actions — all without taking your hands off the lyrics app.
For the end-to-end wiring of program changes and HIT triggers from a lyrics app, see Getting Started — Automate Song Changes and HIT with Stage Traxx.
Troubleshooting reference #
| Symptom | Likely cause | Fix |
|---|---|---|
| "● No device" stays red after clicking Connect | Permission denied, cable, USB driver, or another app holding the port | See device-not-found checklist |
| Editor freezes / doesn't respond to clicks | JS error during load — usually a bad browser cache after an update | Hard-refresh: Cmd+Shift+R. If it persists, clear site data and reload |
| Send shows success but device displays the old preset | The device doesn't auto-switch to the slot you sent. It only reloads if you send to the slot it's currently displaying | Navigate the device to the target slot on the front panel, or send to the slot the device is on |
| Harmony key changes don't take effect on the device | Global Key is enabled in the device's setup — preset-level Key is overridden | Setup tab → Device → Global Key off, or update the global Key in setup instead |
| Tempo changes don't update Delay times | Global Tempo is enabled in setup | Setup tab → Device → Global Tempo off, or change tempo in the global setup |
| Guitar FX block doesn't follow the preset | Global Guitar FX is enabled — guitar FX state shared across all presets | Setup tab → Guitar → Global Guitar FX off (preset-level state takes over again) |
| Learn doesn't capture anything | Setlist input port not selected, or the source app sending on a different port | Live tab → pick a port from the Setlist port dropdown first |
| Setlist Send shows "No port" / "Set first" | Setlist output port not opened | Same — pick a port. Same dropdown handles both directions |
| I clicked Block on the MIDI permission prompt by accident | Browser remembers the denial | See Recovering from denied MIDI access |
| Device unresponsive after firmware update | Failed flash mid-write | Hardware factory reset, then re-flash with known-good firmware |