
Performing Live with Perform
Perform is the on-stage view of the editor. It shows your lyrics, the FX / HIT automation laid out on a timeline beside them, and the buttons you need during a song — and it drives your TC Helicon Play Acoustic / Electric so the right preset loads when each song starts and your HIT / FX fire on cue.
This post walks you through the full setup: building the setlist in the editor's Live tab, opening Perform on your performance device, wiring it to Stage Traxx, and the few Stage Traxx-side settings that make the whole thing work hands-free.
What You Need
- TC Helicon Play Acoustic (or Play Electric) connected via USB.
- A computer or iPad running a browser with Web MIDI support — Chrome / Edge on desktop, or the Web MIDI Browser app on iPad (Safari doesn't support Web MIDI on iOS).
- Stage Traxx (the lyric / playback app) installed on the same iPad, or on a separate device routed via MIDI.
- A Stage Traxx 4 backup (
.st4b) of the songs you want to perform. Either backup type works — Database backup or Full backup; the editor reads only the song / playlist data.
Step 1: Build the Setlist in the Editor
1a — Export a Database backup from Stage Traxx
Open Stage Traxx, then go to Settings → Backups → Create Database Backup (or the equivalent path in your Stage Traxx version — wording shifts between releases). Database backup is the smaller of the two options: it carries the songs, playlists, lyric markers, MIDI tags and timings — everything the editor reads — without the audio tracks. A Full backup also works but it's much larger and the editor ignores the audio portion anyway.
Save the resulting .st4b somewhere you can pick it up from the editor — iCloud Drive / Files / Downloads, AirDrop to your computer, whatever's convenient. Keep this file: it's also your insurance policy for Stage Traxx itself, since Stage Traxx can restore the same backup on a fresh device.
1b — Import the backup into the editor
Open the editor (oddeyez.se/app/) and switch to the Live tab.
In the toolbar, click Import… under the Stage Traxx group. Pick the .st4b you just exported, then choose the playlist you want to perform. Each Stage Traxx song becomes a row in the setlist below — title, artist, BPM, key, PC trigger, lyrics and FX events are all carried over.
For each song, click the preset name to assign which TC Helicon preset should load when the song starts. If a song has key / scale / BPM overrides you want, set them in that row too — they override the preset's stored values at send time.
Save the setlist with a name you'll recognise (Save dropdown → Save as…). The saved bundle carries everything — preset assignments, lyrics, FX timeline, your FX preset bindings, HIT mapping. It's the source of truth for your show.
Step 2: Open Perform
In the Live tab's toolbar, click the orange 🎤 Perform button on the right. Perform opens in a new tab.
If you've used the editor already, Perform may already show the last-loaded setlist. If not — or if you want to be sure you're running the latest version of your show file — load it explicitly via the drawer (next step).
Best practice: always load your setlist file at the start of the gig
Perform remembers your last playlist in browser storage (localStorage), so opening it next time you're at the same machine usually shows the right songs. That's convenient day-to-day. For a live gig, always load your setlist file fresh: it's the only way to guarantee you have the latest version of your show, you haven't drifted into stale config, and you're not depending on browser quirks that might purge storage.
Five extra seconds at the start of soundcheck saves you trying to debug an empty Perform page two minutes before downbeat.
Anatomy of the Perform View
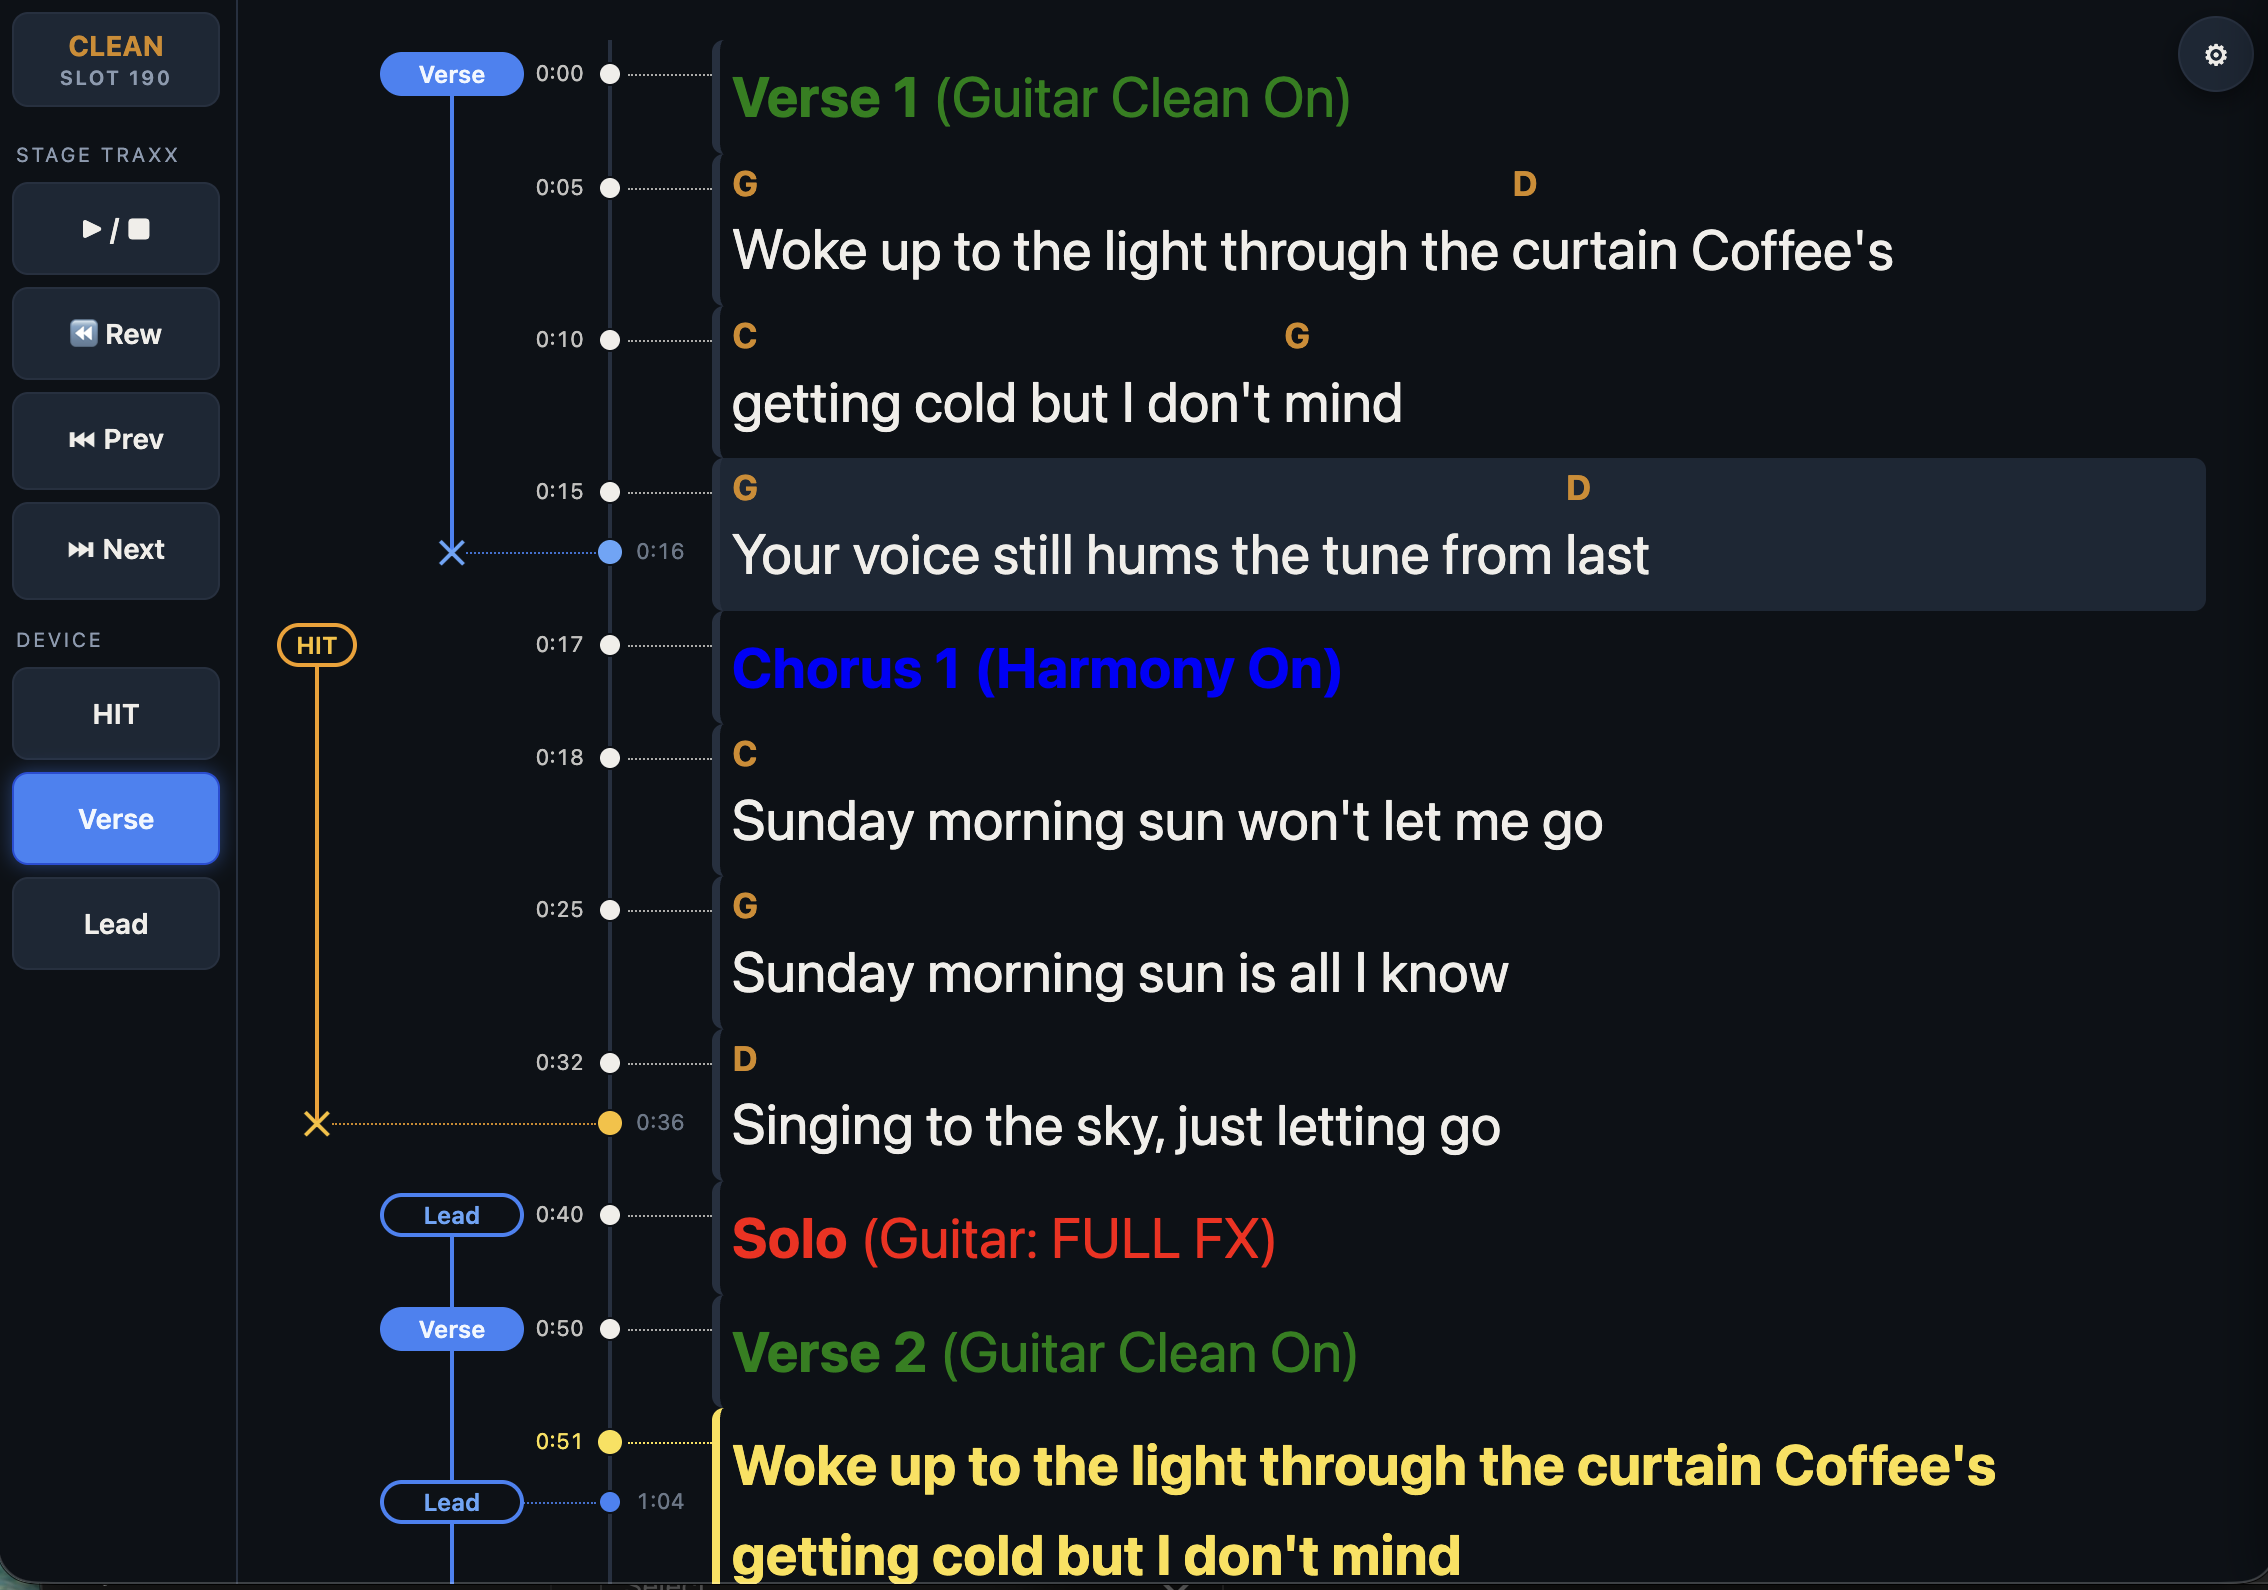
Before configuring the rest, take a moment to learn what each part of the screen does. The two annotated screenshots below label every region you'll interact with — the first walks the main viewer (lyrics, FX timeline, sidebar buttons) and the second covers the framing chrome (top bar, transport, status, drawer toggle).
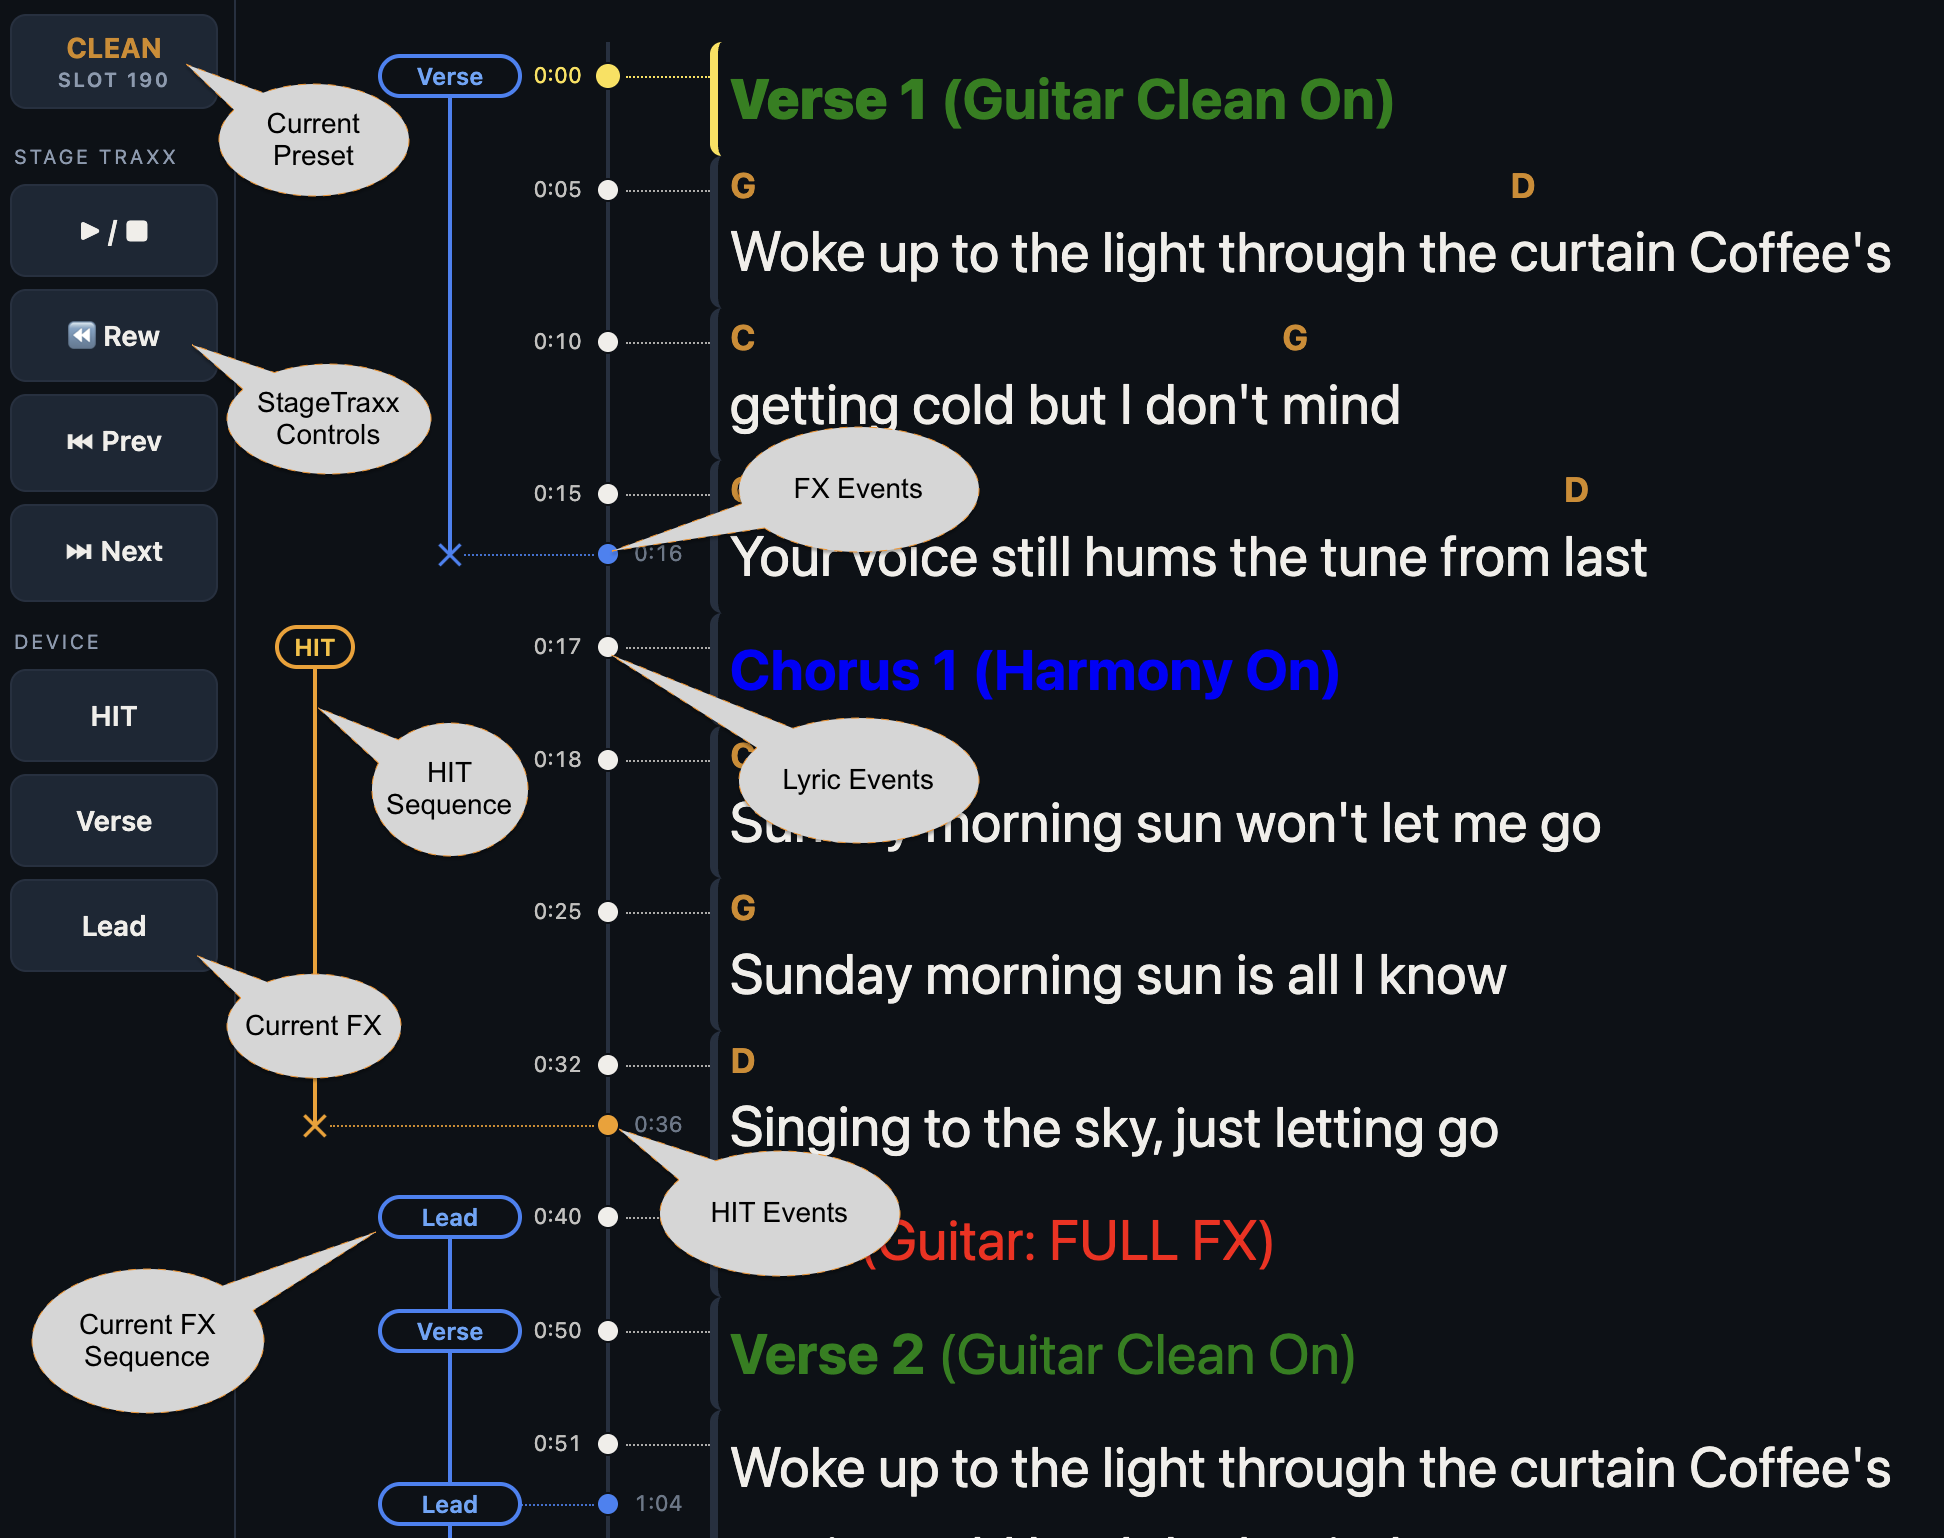
- Lyric column — the song's lyrics, sized by your Lyrics settings (font / colour / highlight in the drawer). The active line gets the highlight colour; chord markers render inline above the words they belong to.
- FX timeline column — runs down the left edge of the lyrics. Each cue point shows up as a coloured chip (orange = HIT, blue = FX preset, purple = PC). Whiskers connect the chip to the lyric word the cue lands on. As the playhead crosses a chip, the chip fires (fills in with brighter colour); it stays lit until the corresponding off-event later in the song.
- HIT & FX buttons (left sidebar) — manual override. Tap any FX preset button to push that preset's parameter overlay to the device immediately (regardless of where the playhead is); tap it again to revert. Tap HIT to toggle the device's HIT state in place. The currently-active FX button is shown filled.
- MIDI activity row (bottom) — diagnostics. Shows whether clock ticks are arriving, the MTC timecode, the most recent incoming MIDI event ("Last:"), and the most recent device-bound write ("Sent:") with a ✓ on verified writes or ⚠ if the device didn't acknowledge. Hide it once you've confirmed everything is flowing — the drawer's Layout section toggles it.
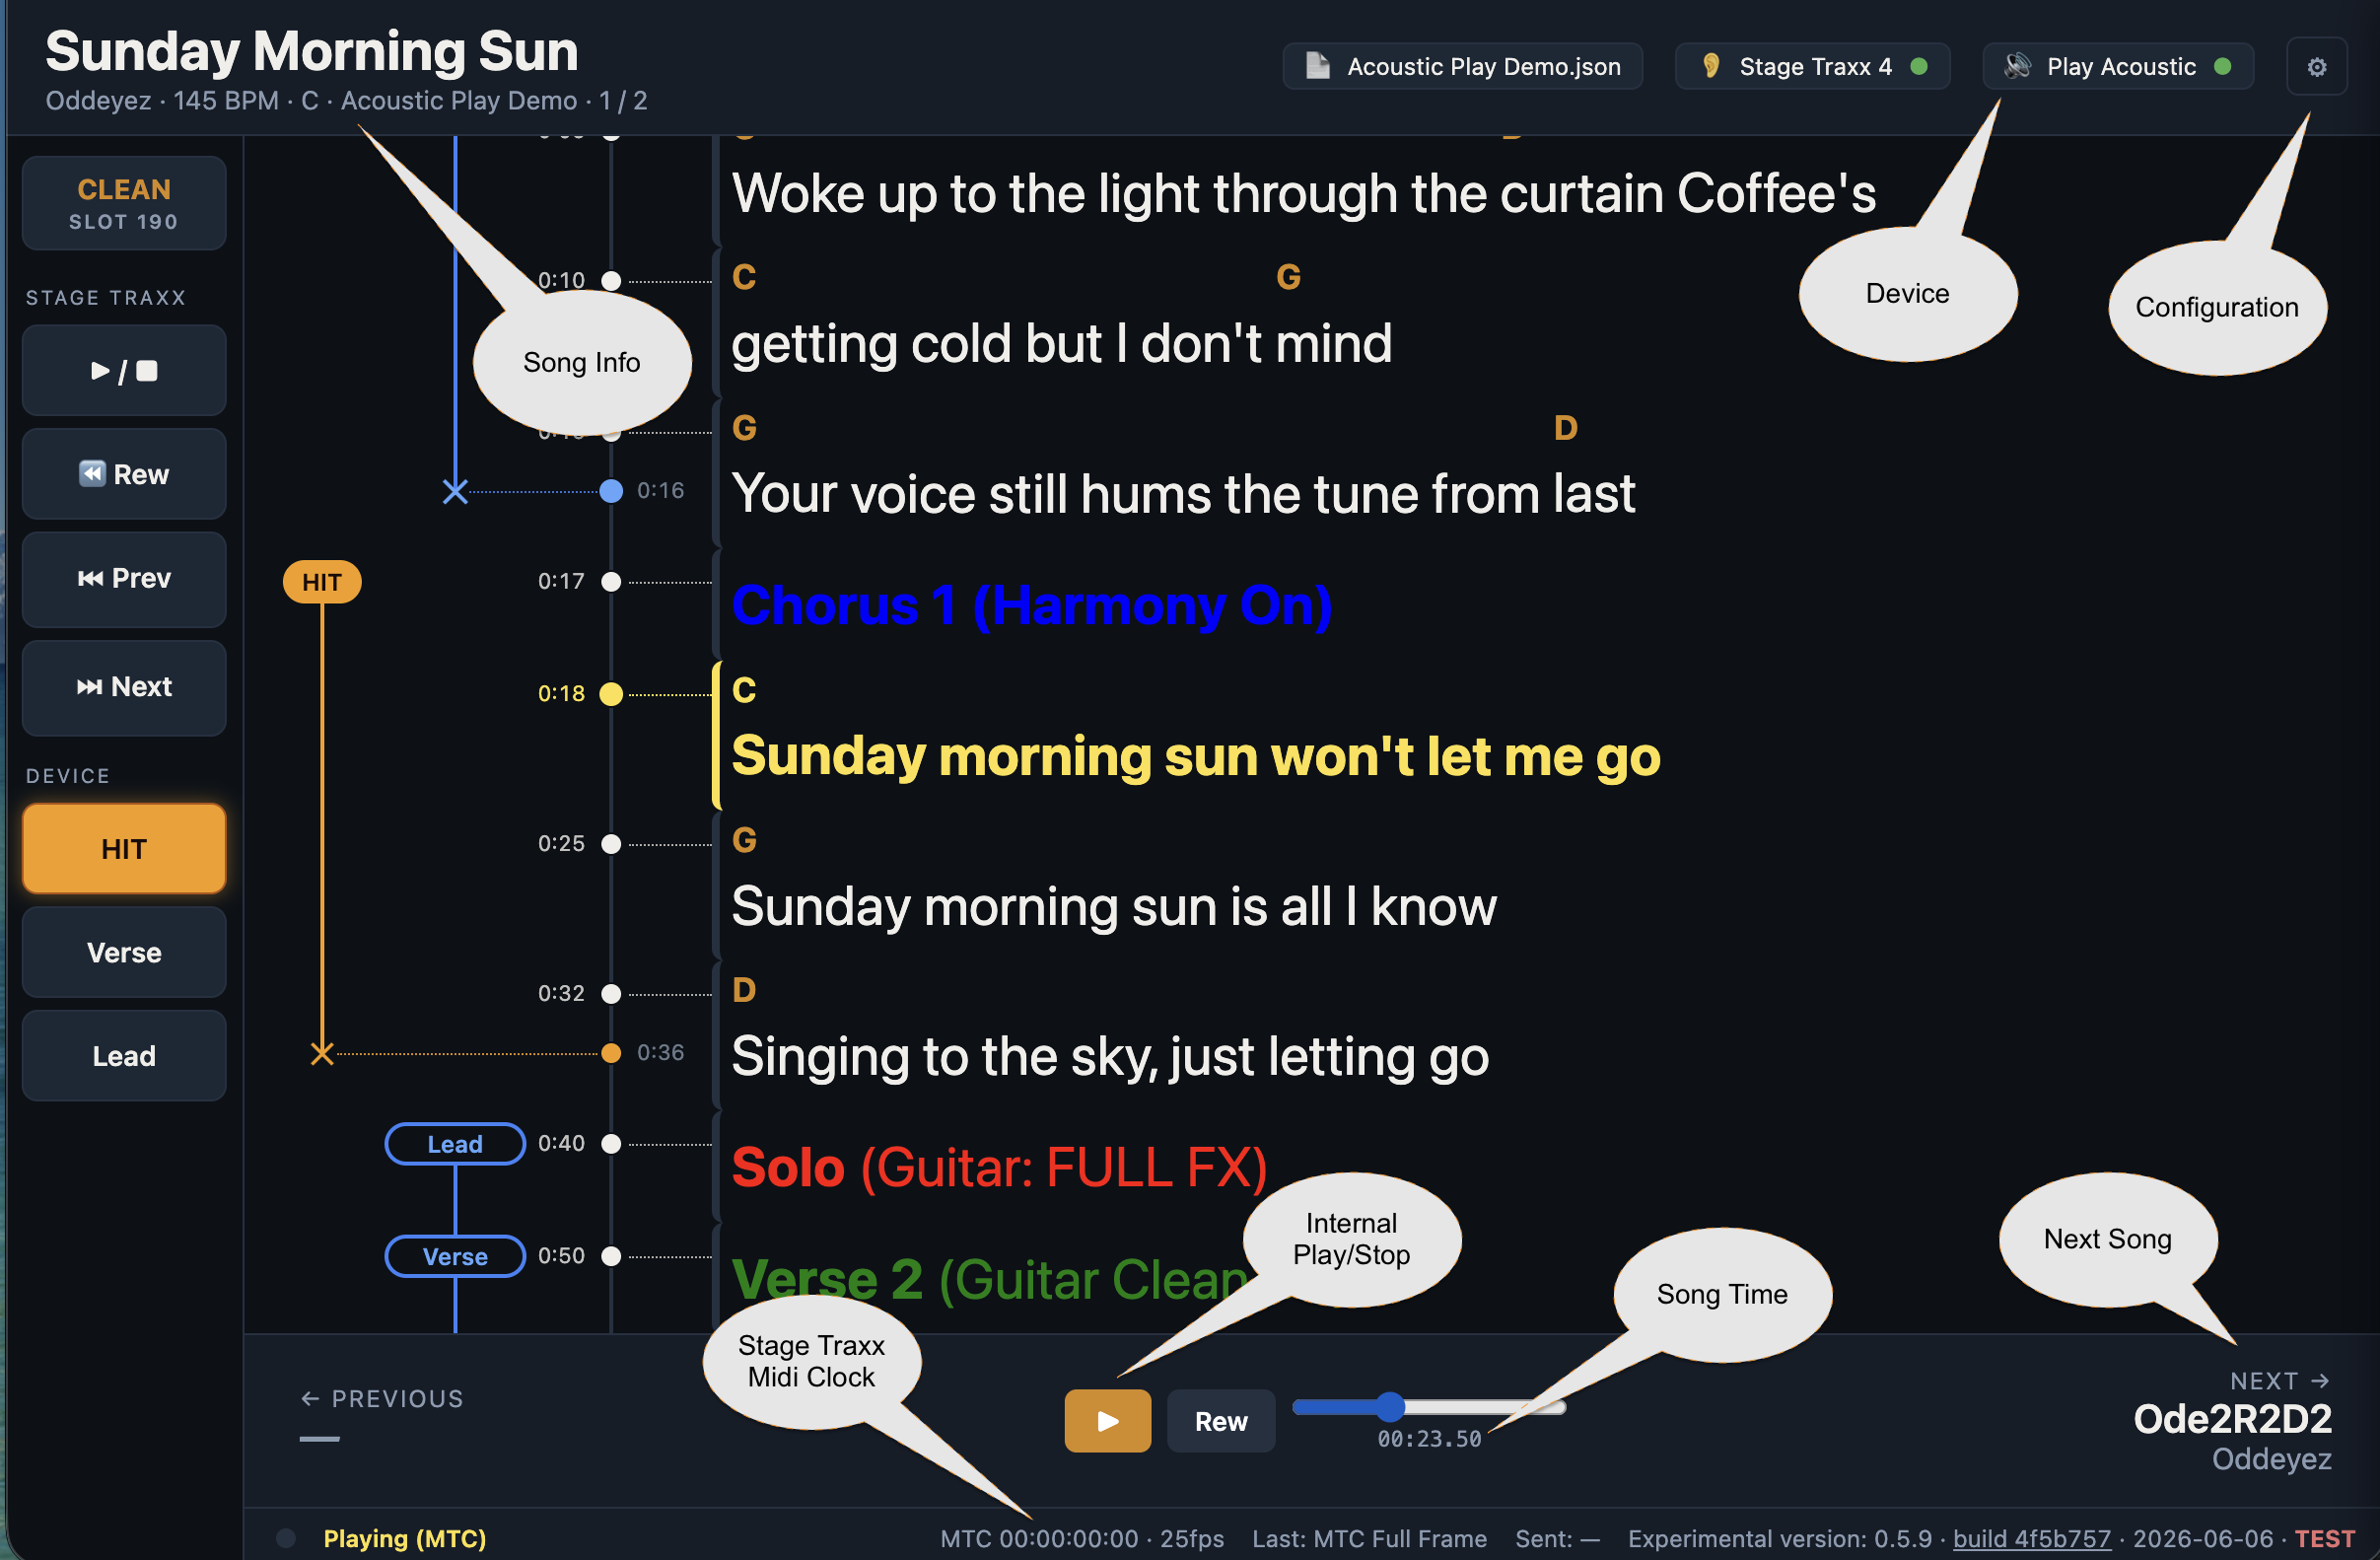
- Song info (top-left) — current song's title and any subtitle / artist line, plus the current preset's name. Updates the moment a song-change PC arrives or when you jump via the Next / Previous song panels.
- Status pills — three quick-glance indicators: 📄 Loaded setlist (red ● if you've drifted from the saved bundle), 👂 MIDI input port name + ●/○ state, 🔊 device output port name + ●/○ state. All three are clickable: the 📄 pill jumps into the drawer's Setlist section; the others open the same drawer at the MIDI ports section.
- ⚙ Settings button — opens the drawer. Hide the top bar via the drawer's Layout section and ⚙ reappears as a floating circle in the corner so you can still reach it.
- MIDI clock LED — flashes on each incoming 0xF8 tick, so you can tell at a glance whether Stage Traxx is actually clocking Perform. No flash = no clock = playhead doesn't move.
- Internal clock controls — ▶ play (toggles to ⏸ when running), Rew, and the seek scrubber with elapsed time underneath. These drive Perform's own playhead; useful for standalone gigs or rehearsing without Stage Traxx. The moment a Stage Traxx clock tick arrives, the local timer hands over.
- Next song panel (right) — title of the next song in the setlist; click to jump to it directly. Mirror panel on the left jumps to the previous song. Both are clickable shortcuts so you can scrub through the setlist without going through Stage Traxx.
Step 3: Configure MIDI Ports in Perform
Tap the ⚙ button at the top-right of Perform. The settings drawer slides in from the right.
Under Setlist, pick your saved file from Bundled sample (if it's a sample) or click Load .json… to pick your own. The page reloads with the new playlist + FX layout.
Under MIDI ports, there are three selectors:
- Device — the TC Helicon's MIDI port. Perform sends the song's preset bytes here on every song change, and translates the timeline's HIT / FX events into the SysEx setup reads/writes the device actually accepts. Auto-pick only matches ports whose name contains "Play Acoustic" or "Play Electric" — if your TC Helicon shows up under a different name, pick it manually.
- Stage Traxx out — Stage Traxx's MIDI input port. Perform sends transport CCs (Play / Stop, Rewind, Prev / Next song) here so Stage Traxx can MIDI-learn them.
- Stage Traxx in — Stage Traxx's MIDI output port. Perform receives clock + MTC (lyric playhead) and Program Change (song selection) from this port. Note: incoming raw CCs from Stage Traxx aren't forwarded as-is to the device — the Play Acoustic ignores incoming MIDI CC on USB. Perform's own timeline (built from the setlist's lyric markers) is the authority for HIT / FX events; the on-disk setlist file carries the overlay each preset applies.
Each selector's status pill below shows Connected / Listening in green when wired up, Disconnected in red if the saved port isn't available, or — when nothing is picked.
Step 4: Wire the Transport Buttons in Stage Traxx
In Perform's drawer, scroll to Stage Traxx MIDI-learn. You'll see four rows — Play / Stop, Rewind, Previous song, Next song — each with a Send button.
For each row:
- In Stage Traxx, open Settings → Remote Control → Assign Actions (their docs walk through the exact taps).
- Pick the action you want to bind — e.g. Play / Pause.
- Stage Traxx waits for a MIDI message. Click Send next to the matching row in Perform's drawer.
- Stage Traxx learns that CC. Repeat for the remaining three actions.
Once learned, the buttons in Perform's left sidebar (▶ / ■, ⏪ Rew, ⏮ Prev, ⏭ Next) drive Stage Traxx directly. Useful if your iPad is just out of reach mid-song.
Step 5: Pick a Clock Source
Perform's lyric playhead and HIT/FX cueing need something to drive time. You've got two options — pick whichever fits your rig.
Option A: Stage Traxx drives the clock (most common)
In Stage Traxx, enable MIDI Clock and MIDI Program Change output. Per song, set the song's Load Trigger to a Program Change number. Perform's setlist maps each PC to one of your songs — when Stage Traxx switches songs, it fires the matching PC, Perform sees it, and pushes the right preset to the device. Stage Traxx then streams MIDI Clock (and optionally MTC) as it plays, and Perform's playhead follows.
This is the right choice if you also use Stage Traxx for backing tracks — one timeline, one tempo, no drift between Stage Traxx's audio and Perform's HIT cues.
Keep Stage Traxx alive in the background
By default Stage Traxx goes to sleep when it's not the foreground app — which stops MIDI output the moment you switch to Perform. Find the Auto sleep / Background audio / Always on toggle in Stage Traxx → Settings → Audio (the wording varies by version) and turn it ON / disable auto-sleep. Stage Traxx keeps its audio engine running while backgrounded, MIDI keeps flowing, and Perform stays clocked.
On iPad you can also run both apps in Split View or Stage Manager — both stay foreground, no sleep concern.
Option B: Perform's internal clock (no Stage Traxx needed)
Each song in the lyric viewer has its own ▶ Play button. Tap it and Perform advances its own playhead at real-time, firing HIT and FX cues as the lyrics scroll. No external MIDI source needed — handy if you're running Perform stand-alone for a coffee-shop solo set, or rehearsing without the rest of your rig.
You can switch back and forth: hit ▶ to drive locally, then start Stage Traxx and Perform's clock takes over the next time a MIDI tick arrives. The internal timer politely stops itself when external clock shows up.
Step 6: Tune the Perform Layout
Perform's drawer (⚙) has a Layout section with seven independent toggles so you can show exactly the parts of the view you need — nothing more. Every toggle persists per browser and recalls on the next launch, so you set this once per device.
The seven view parts
Perform's screen has three rows (top bar, lyrics-and-FX viewer, MIDI activity footer) plus a buttons column on the left. Each is independently hideable:
- Show top bar — the header with song title, MIDI port pills (📄 Loaded · 👂 input · 🔊 device), and the ⚙ drawer button. Hiding it gives you a few more pixels of lyric height; the ⚙ button reappears as a floating circle bottom-right so the drawer is still reachable.
- Show time bar — the row immediately under the header showing the previous song (left), the current song's ▶ / Rew controls + seek slider (centre), and the next song (right). Hide it if Stage Traxx drives transport for you and you don't need the local clock controls.
- Show buttons — the left sidebar with HIT, FX presets, and transport buttons. Hide it for a pure lyric-scroller layout.
- Show lyrics — the lyric column itself. Hide it to leave only the FX timeline + buttons (e.g. when Stage Traxx already shows the lyrics next door).
- Show effects timeline column — the HIT / FX lane that runs beside the lyrics. Hide it for a pure lyric scroller.
- Show MIDI activity row — the bottom diagnostic footer (clock LED · status · MTC · Last · Sent). Useful during setup, redundant during the gig — turn it off once you've confirmed MIDI is flowing.
- Compact (buttons only) — overrides everything above and shows just the buttons column. Designed for sitting next to Stage Traxx in iPad Split View / Stage Manager. When Compact is on, the other six toggles vanish from the drawer (they're all overridden anyway).
Common layouts
A few combinations that work well in practice:
- Full — everything on. Perform is your single window on the iPad / laptop, drives both lyrics and FX. Best for a solo gig where Perform IS the performance display.
- Stage-ready minimal — top bar off, time bar off, MIDI activity off, everything else on. Just lyrics + FX timeline + buttons, no chrome. Maximum lyric area; the floating ⚙ in the corner stays put so you can still reach the drawer if you need to.
- Lyrics only — uncheck Show buttons, Show effects timeline column. Use when Stage Traxx already handles transport and FX cues, and you only want a big readable scroller. Pair this with hiding the time bar too if you really just want pure text.
- FX panel beside Stage Traxx — Compact on. Stage Traxx in one Split View pane shows the lyrics; Perform in the other shows the current preset + HIT / FX buttons. The Compact column is narrow enough that Stage Traxx still has room to be the primary display.
- Setup / debugging — top bar on, MIDI activity on. The activity row tells you whether clock ticks are arriving, what tempo they imply, and what the most recent CC / preset send was. Once everything works, hide both rows for the gig.
Viewport choices are independent of clock source — pair any layout with either Stage Traxx-driven or internal clock. The buttons row stays operative either way.
The Lyrics and Chord sections below let you tune font sizes and colours. Like the layout toggles, they persist per browser — they're not stored in the setlist file, so each performer can have their own readability preferences without forking the show file.
Working Offline at the Venue
Perform is a PWA with a service worker that caches the app shell. Once installed and visited once online, it runs without internet — useful for venues with flaky wifi or air-gapped stages.
Before you leave home
- Install Perform. Chrome / Edge → address-bar install icon, or the kebab menu → "Install Perform". iPad → Add to Home Screen from the share sheet. The install fires the service worker's pre-cache step, which pulls the HTML, JS modules, manifest and icons into the cache up front.
- Open Perform once online and load your setlist. The drawer → "Load .json…" pick warms
localStoragewith the setlist, FX presets, HIT mapping and CC labels. From this moment on, the same content is available offline — opening Perform on the venue's network or no network at all will read the same data from local storage. - Verify the Loaded pill on the header. The 📄 pill in the header shows the bundle name and how long ago it loaded. If the ● dot is lit (modified vs bundle), tap it and either revert or save back so the on-disk JSON and localStorage agree before you pack up.
At the venue
- Launch from the home-screen icon (not a browser tab or URL). The PWA shell uses cached assets; it doesn't try to reach the network for the page itself.
- Re-load the JSON from disk via the drawer if you want fresh state for the gig. The "Load .json…" file picker uses
FileReader— no network involved — so a memory card or AirDropped file works the same as a downloaded one. - MIDI is local. Stage Traxx ↔ Perform ↔ TC Helicon all run over USB / iPad-native MIDI; none of it touches the network.
What still wants a network
- The bundled "Sample setlists" and factory
.tchpacks. First fetch needs internet. After they've been opened once, the service worker keeps them — but a brand-new device pulling a factory pack for the first time needs wifi for that one request. - PostHog telemetry. Silent failure when offline; the editor and Perform both keep working, no events get sent until you're online again.
Cache-sanity checks
- If Perform looks frozen on an old version after a deploy, the network-first service worker pulled the new HTML on the most recent online visit — close + relaunch the home-screen app and you'll see the fresh build.
- iOS aggressively evicts PWA storage if the device is low on space. If you depend on Perform offline at a multi-day gig, keep a recent online visit fresh in memory and avoid letting the device go to extreme low-storage states.
Step 7: Install Perform as a PWA (optional but recommended)
Perform has its own webmanifest — Chrome / Edge / Android Chrome will offer to install it as a separate app. On iPad, open Perform in Web MIDI Browser, then add the URL to your home screen — the icon launches Perform in standalone mode, which iOS preserves much better through lock cycles than a regular browser tab.
What Happens During a Song
Once everything is wired up, a typical song run goes like this:
- Stage Traxx switches to song N — fires Program Change N.
- Perform receives the PC, looks up song N in the setlist, builds the preset SysEx (with your key / scale / BPM overrides applied), and sends it to the TC Helicon's live slot.
- Stage Traxx starts playback — sends MIDI Clock + MTC. Perform's lyric playhead follows.
- At each FX cue point in the timeline, Perform reads the device's current setup over SysEx, overlays the FX preset's parameter changes onto it (e.g. Verse turns guitar delay off, guitar reverb off), and writes the modified setup back — all in one round-trip. The matching off-event later in the song restores the setup values that were live before the overlay.
- HIT events take the same path: Perform reads setup, flips the HIT byte (packet 3 byte 41), writes setup back. The device engages HIT live.
- End of song — Stage Traxx advances to the next, fires the next PC, Perform loads the next preset. Repeat.
(If you're using Perform's internal clock instead, swap steps 1–3 for "tap ▶ on the song's Play button" — everything else is identical.)
You read lyrics, the device follows the song. No tap dancing on a footboard.
A note on timing & latency
Stage Traxx → Perform → device is a real-time chain but it's not zero-latency. Each HIT or FX event triggers a setup-blob round-trip with the TC Helicon: read seven SysEx packets back from the device, modify the relevant bytes, write seven packets back, wait for the device's ACK. End-to-end that's typically ~200–700 ms per event, occasionally longer over USB hubs / shared MIDI bridges. Preset changes (song change) are a single write rather than a round-trip and are noticeably faster, but still take ~150 ms.
Practical implications when authoring your .st4b:
- Don't put HIT or FX events on the downbeat. Place them ~250 ms before where you want them to land — the device will catch up and the change happens audibly on the beat instead of half a beat late. Test on the real rig and shift as needed.
- Avoid rapid-fire toggles. Two cues separated by less than ~300 ms will serialise (Perform queues setup ops so they don't collide with each other), and the second one will land later than its lyric marker suggests. If you need a quick on/off, give it at least half a beat at moderate tempo or design the moment to ride a single longer event.
- Test the full chain in soundcheck. The latency depends on the TC Helicon's firmware, your USB hub, whether you're going through an iPad camera-adapter, and a couple of other variables. Run the song once with all cues live and listen for any cue that's noticeably late, then nudge it earlier in Stage Traxx.
- Use the activity row to check. The "Sent:" stat shows each device write with ✓ on a verified write. If you see ⚠ or no ✓ on a cue, the device didn't acknowledge — usually it caught up but the verify read didn't land before the next cue, which is a sign the cues are too close together.
The same caveat applies to manual button taps in Perform's sidebar (HIT / FX). Each tap fires the same round-trip, so a rapid double-tap will serialise.
Here's the whole flow end-to-end on a real rig:
Troubleshooting
- Device pill says "Not connected"
- The Device port in the drawer is empty. Pick your TC Helicon manually if the auto-pick didn't catch it (the auto-pick only matches "Play Acoustic" / "Play Electric" in the port name).
- Stage Traxx stops sending MIDI when I switch apps
- Open Stage Traxx settings and disable Auto sleep / enable background audio. Or run Stage Traxx and Perform side-by-side in Split View / Stage Manager.
- The chip in the FX timeline says "CC34" instead of a friendly name
- The setlist file doesn't have an FX preset mapped to that CC. Go to the editor's Live tab → Live Controls card → add an FX preset binding CC34 (with the parameter overlay it should apply when active), save the setlist, reload Perform.
- The chip lights up in Perform but nothing happens on the device
- Most likely the FX preset has no parameter overlay configured — there's nothing for Perform to write to the device's setup. Open the editor's Live tab, edit the FX preset, tick the params it should change (gtr-delay / gtr-reverb / etc.), save the setlist, reload Perform. The Perform footer's "Sent:" indicator should then show "Verse on ✓" etc. on each cue.
- Switching browser tabs and back loses the editor
- Web MIDI Browser caches the original tab URL. Bookmark
/app/perform.htmldirectly (or set it as the browser's home page) instead of going through the marketing site.